Hyundai Tucson: Replacement and Air Bleeding
WARNING
Never remove the reservoir tank cap when the engine is hot. Serious scalding could be caused by hot fluid under high pressure escaping from the radiator.
WARNING
- When pouring engine coolant, be sure to shut the relay box lid and not to let coolant spill on the electrical parts or the paint. If any coolant spills, rinse it off immediately.
- When changing the coolant and draining air, be sure to follow the filling instructions of the Integrated Thermal Management Module (ITM).
If Diagnostic Tool is available, change the coolant and drain air according to the descriptions below.
- Make sure the engine and radiator are cool to the touch.
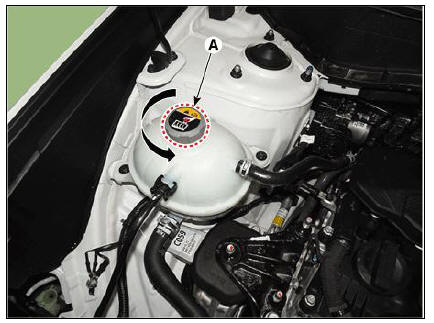
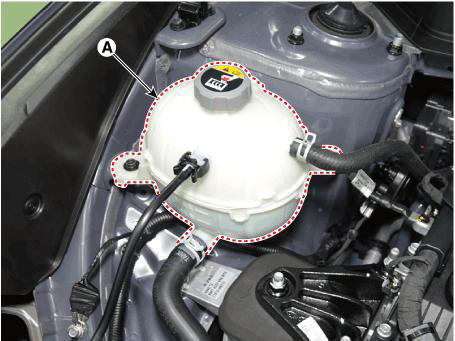
- Remove the coolant reservoir tank cap (A).
- Remove the engine room under cover.
(Refer to Engine and Transaxle Assembly - "Engine Room Under Cover")
- Loosen the drain plug (A), and drain the coolant.
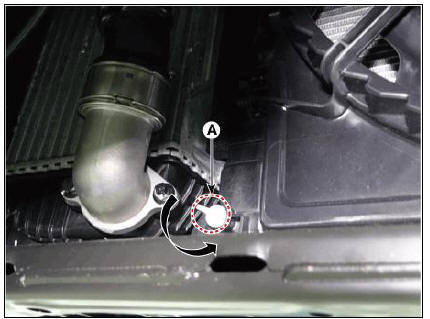
- Tighten the radiator drain plug securely after draining the coolant.
- Clean the coolant reservoir tank after drain the coolant.
- IG Key OFF, Fill with fluid mixture of coolant and water (45 - 60%) slowly through the coolant reservoir tank cap.
Coolant capacity
Approx. 7.6 L (2.01 US.gal., 8.03 US,qt., 6.68 Imp.qt.)
WARNING
- Fill the coolant as much as possible with the engine OFF.
- Press the upper / lower hoses on the radiator so that the air can get out easily.
- Use only genuine antifreeze/coolant.
- For best corrosion protection, the coolant concentration must
be maintained year-round at 45 - 60% minimum.
Coolant concentrations less than 45 - 60% may not provide sufficient protection against corrosion or freezing.
- Coolant concentrations greater than 60% will impair cooling efficiency and are not recommended.
- Do not mix different brands of antifreeze/coolants.
- Do not use additional rust inhibitors or antirust products; they may not be compatible with the coolant.
- Connect the diagnostic tool and then Key 'IG ON'.
- Use the diagnostic tool to activate the "integrated thermal management module (ITM) coolant refilling mode".
- Complete the ITM coolant refilling mode according to the procedure of the diagnostic tool.
- Key-off and then disconnect the diagnostic tool.
WARNING
Key-off :
- Turn Key: The start key has been removed from the keybox.
- Button key (including SmartKey): Power(ACC, ON) is not activated.
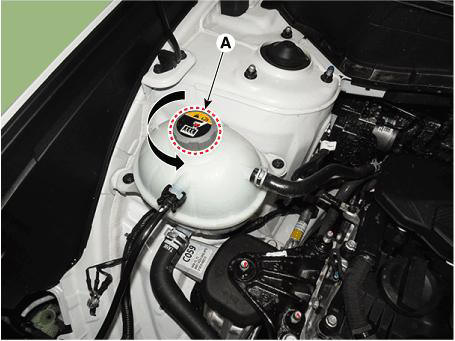
- Install the coolant reservoir tank cap (A).

- Check the coolant quantity after driving the vehicle.
- If the coolant is insufficient, replenish it.
- Install the engineroom under cover.
(Refer to Engine and Transaxle Assembly - "Engine Room Under Cover")
If Diagnostic Tool is not available, replace the coolant and drain air according to the descriptions below.
- Make sure the engine and radiator are cool to the touch.
- Remove the coolant reservoir tank cap (A).
- Remove the engine room under cover.
(Refer to Engine and Transaxle Assembly - "Engine Room Under Cover")
- Loosen the drain plug (A), and drain the coolant.
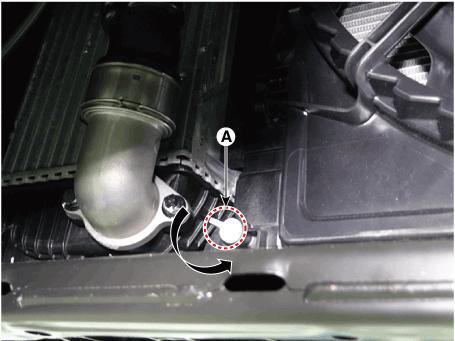
- Tighten the radiator drain plug securely after draining the coolant.
- Clean the coolant reservoir tank after drain the coolant.
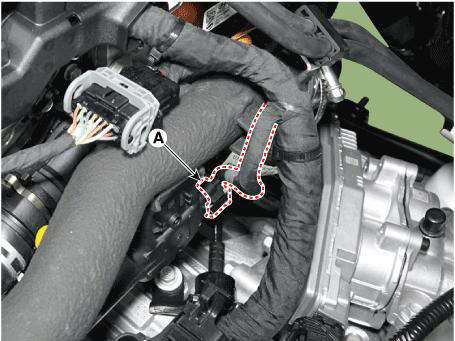
- Key-off and then disconnect the integrated thermal management module (ITM) connector (A)
WARNING
- When disconnecting the integrated thermal management module (ITM) connector, make sure that there is no power to the engine and other components.
- Be careful that static electricity and other voltages are not applied to the integrated thermal management module (ITM).
- Do not bring anything with magnetism, such as a magnet, close to the integrated thermal management module (ITM).
WARNING
Key-off :
- Turn Key: The start key has been removed from the keybox.
- Button key (including SmartKey): Power(ACC, ON) is not activated.
- Fill with fluid mixture of coolant and water (45 - 60%) slowly through the coolant reservoir tank cap.
Coolant capacity
Approx. 7.6 L (2.01 US.gal., 8.03 US,qt., 6.68 Imp.qt.)
WARNING
- Fill the coolant as much as possible with the engine and all power OFF.
- Press the upper / lower hoses on the radiator so that the air can get out easily.
- Use only genuine antifreeze/coolant.
- For best corrosion protection, the coolant concentration must be maintained year-round at 45 - 60% minimum.
- Coolant concentrations less than 45 - 60% may not provide sufficient protection against corrosion or freezing.
- Coolant concentrations greater than 60% will impair cooling efficiency and are not recommended.
- Do not mix different brands of antifreeze/coolants.
- Do not use additional rust inhibitors or antirust products; they may not be compatible with the coolant.
- After starting the engine, refill the coolant for 20 minutes used by coolant reservoir tank.
- After shut engine off and connect the integrated thermal management module (ITM) connector (A).

WARNING
- When connecting the integrated thermal management module (ITM) connector, water or oil must be completely removed from the connector and no foreign matters should be entered.
- When replacing the integrated thermal management module (ITM) connector, be sure to use the specified connector
- After starting the engine for 5 seconds, turn off the engine.
WARNING
- This procedure is repeated 3 times.
- Check if the check engine light is OFF in the 4th after 3 repetitions.
- Install the coolant reservoir tank cap (A).

- Check the coolant quantity after driving the vehicle.
- If the coolant is insufficient, replenish it.
- Install the engineroom under cover.
(Refer to Engine and Transaxle Assembly - "Engine Room Under Cover")
Removal and Installation
- Drain the coolant.
(Refer to Cooling System - "Coolant")
- Disconnect the degassing hose (A) and coolant reservoir tank hoses (B).

- Remove the coolant reservoir tank (A).
Tightening torque : 7.8 - 11.8 N.m (0.8 - 1.2 kgf.m, 5.8 - 8.7 lb-ft)
- Install in the reverse order of removal.
- Fill with engine coolant.
(Refer to Cooling System - "Coolant")
WARNING
The coolant must be injected according to the integrated thermal management module (ITM) coolant filling method.
READ NEXT:
 Cooling Fan Assembly
Components
Cooling fan
Fan motor
Cooling fan shroud
Cooling Fan Assembly
Disconnect the negative battery terminal.
Remove the radiator.
(Refer to Cooling System - "Radiator")
Remove the cooling fan (A) from the rad
Fan motor
Turn ignition switch "OFF" and connect the diagnostic tool to the Data
Link Connector.
With the gear shift in P (Park) position and ignistion switch "ON" (LED
of the Power button illuminates in Red), select the "fo
Integrated Thermal Management Module (ITM)
Components
Integrated thermal management module (ITM)
Heater pipe
Heater hose
Turbo charger coolant hose
Heater pipe A
Heater pipe A gasket
Oil cooler hose A
Oil cooler pipe
Integrated Thermal Management Module (ITM)
WARNING
SEE MORE:
Battery Condition - Vehicle parasitic current inspection
Inspection
Check the battery for damage or deformation. If severe damage, deformation or
leakage is found, replace the
battery.
Using the Ammeter
Turn the all electric devices OFF, and then turn the ignition switch OFF.
Close all doors exc
Catalytic converter - Components
Warm up catalytic converter
Warm up catalytic converter gasket
Warm up catalytic converter upper stay bracket
Warm up catalytic converter lower stay bracket
Cylinder head heat peotector
Oil feed pipe
Torbo charhe water outlet hose
Information
- Home
- Hyundai Tucson - Fourth generation (NX4) - (2020-2023) - Owner's Manual
- Hyundai Tucson - Fourth generation (NX4) - (2020-2023) - Workshop Manual
