Hyundai Tucson: Cylinder Block - Disassembly
WARNING
- Use fender covers to avoid damaging painted surfaces.
- To avoid damage, unplug the wiring connectors carefully while holding the connector portion.
WARNING
- Mark all wiring connector and hoses to avoid misconnection.
- To release the fuel system pressure before removing the engine assembly, start the engine without fuel pump relay. Then, switch "OFF" the ignition when engine stops.
- Remove the engine and transaxle assembly.
(Refer to Engine and Transaxle Assembly - "Engine and Transaxle Assembly")
- Remove the rear oil seal.
(Refer to Cylinder Block - "Rear Oil Seal")
- Install the engine assembly to engine stand for disassembly.
- Remove the cylinder head.
(Refer to Cylinder Head Assembly - "Cylinder Head")
WARNING
Turn the crankshaft pulley so that the No. 1 piston is at top dead center.
- Remove the oil filter body.
(Refer to Lubrication System - "Oil Filter & Oil Cooler")
- Remove the oil pump.
(Refer to Lubrication System - "Oil Pump")
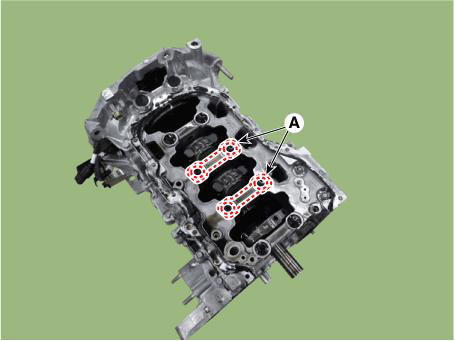
- Remove the piston and connecting rod assembly.
(1) Using a ridge reamer, remove all the carbon from the top of the cylinder.
(2) Remove the connecting rod bearing caps (A).
WARNING
Mark the connecting rod, and caps to be able to reassemble in the original position and direction.
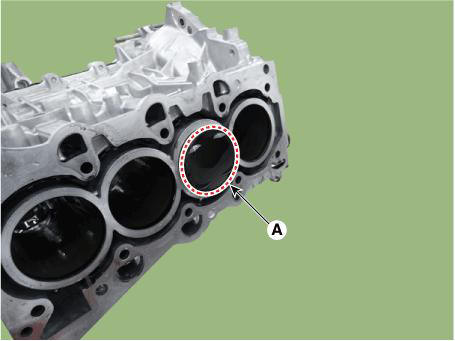
(3) Push the piston and connecting rod assembly (A) with upper bearing through the top of the cylinder block.
WARNING
- Keep the connecting rod ands cap with their bearings assembled together.
- Arrange the piston and connecting rod assemblies in the correct order.
- Check fit between piston and piston pin.
Try to move the piston back and forth on the piston pin.
If any movement is felt, replace the piston and piston pin as a set.
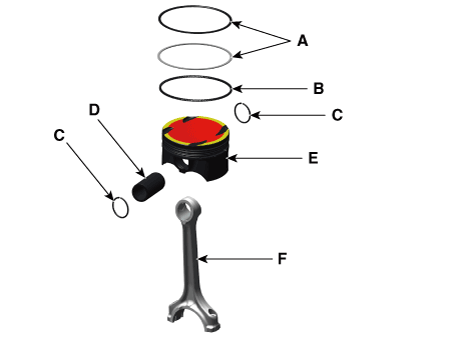
- Disassemble the piston rings.
(1) Using a piston ring expender, remove the 2 piston rings (A).
(2) Remove the oil ring (B) by hand.
- Disassemble the connecting rod from the piston.
(1) Remove the snap ring (C) from the piston.
(2) Using a press, remove the piston pin (D) from the piston.
(3) Disassemble the piston (E) and connecting rod (F).
READ NEXT:
 Connecting Rod
Inspection
Check the side clearance between piston and connecting rod.
Using feeler gauge, measure the side clearance while moving the connecting
rod back and forth.
Side clearance
Standard : 0.1 - 0.25 mm (0.0039 - 0.0098 in.)
Maximum
Piston
Clean the piston.
(1) Using a gasket scraper, remove the carbon from the piston top.
(2) Using a groove cleaning tool or broken ring, clean the piston ring grooves.
(3) Using solvent and a brush, thoroughly clean the piston.
WARNING
Do
Piston Rings
Inspect the piston ring side clearance.
Using a feeler gauge, measure the clearance between new piston ring and the
wall of ring groove.
Piston ring groove width dimension of piston
No.1 ring : 1.230 - 1.250 mm (0.0484 - 0.0492 in.)
No.2 r
SEE MORE:
TPMS Receiver : BCM(body control module) integrated management
Description
Mode
(1) Virgin State
The receiver as a sole part is shipped in this state. Replacement parts
should therefore arrive
in this state.
In this state, there is no Auto-Location, no sensor wake-up, no sensor
monitorin
Lane Following Assist (LFA)
Lane Following Assist is designed to help
detect lane markings and/or vehicles on
the road, and assists the driver's steering
to help center the vehicle in the lane.
Detecting sensor
[1] : Front view camera
The front view camera is used as
Information
- Home
- Hyundai Tucson - Fourth generation (NX4) - (2020-2023) - Owner's Manual
- Hyundai Tucson - Fourth generation (NX4) - (2020-2023) - Workshop Manual
