Hyundai Tucson: Transfer Assembly- Inspection
Inspection
- Remove the engine room under cover.
(Refer to Engine Mechanical System - "Engine Room Under Cover")
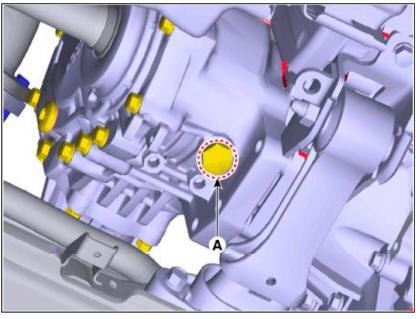
- Loosen the oil filler plug (A).
A Type
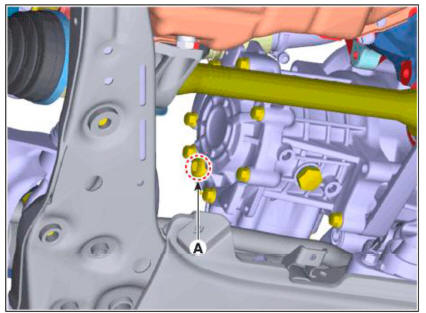
B Type
- Check the oil level.
WARNING
Oil level must be up to fill the hole, if not, add oil until it runs
over. 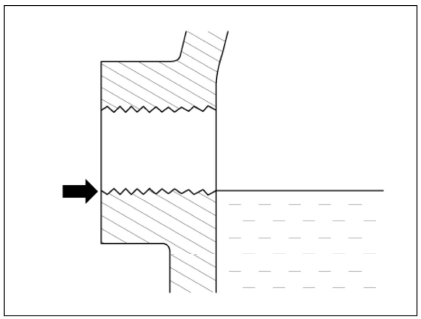
- Install the oil filler plug with new gasket.
Tightening torque : 39.2 - 58.8 N.m (4.0 - 6.0 kgf.m, 28.9 - 43.4 lb-ft)
- Install the engine room under cover.
(Refer to Engine Mechanical System - "Engine Room Under Cover")
Replacement
WARNING
 Severe driving
conditions
Severe driving
conditions
- Driving in dusty, rough roads
- Drivng in mountains areas
- Driving for patrol car, taxi, commercial car or vehicle towing
- Driving over 170Km h
* Transfer oil should be replaced if the transfer assembly is fall into the water.
- Remove the engine room under cover.
(Refer to Engine Mechanical System - "Engine Room Under Cover")
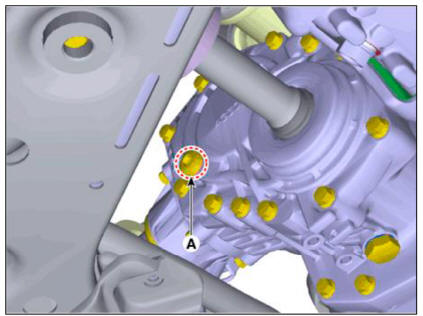
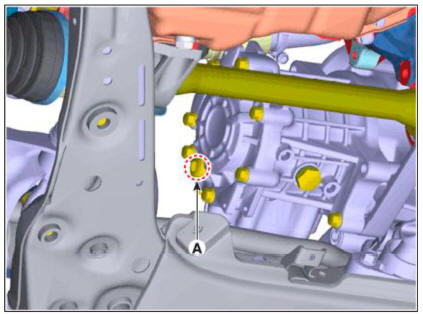
- Drain the transfer oil after loosening the drain plug (A).
A Type

B Type
- Install the drain plug with new gasket.
Tightening torque : 39.2 - 58.8 N.m (4.0 - 6.0 kgf.m, 28.9 - 43.4 lb-ft)
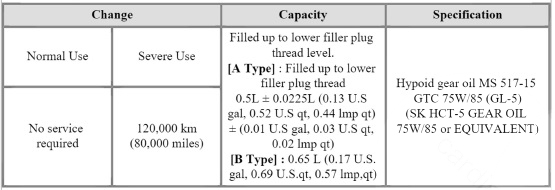
- Refill the transfer specified oil after loosening the filler plug (A).
Specified oil: Hypoid gear oil, MS 517-15 GTC 75/85 (GL-5) Capacity : Filled up to lower filler plug thread level.
A Type : 0.5L +- 0.0225L(0.13 U.S gal, 0.52 U.S qt, 0.44 Imp qt) +- (0.01 U.S gal, 0.03 U.S qt, 0.02 Imp qt) B Type : 0.65 L (0.17 U.S.gal, 0.69 U.S.qt, 0.57 lmp,qt)
A Type
B Type
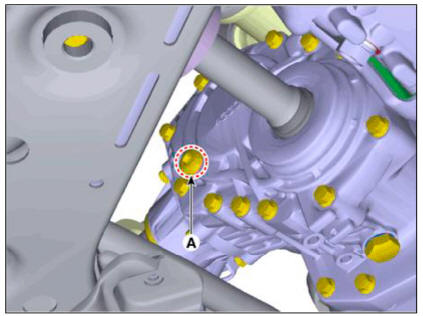
- Install the filler plug with new gasket.
Tightening torque : 39.2 - 58.8 N.m (4.0 - 6.0 kgf.m, 28.9 - 43.4 lb-ft)
- Install the engine room under cover.
(Refer to Engine Mechanical System - "Engine Room Under Cover")
READ NEXT:
 Transfer Assembly- Removal
Removal
A Type
Remove the engine room under cover.
(Refer to Engine Mechanical System - "Engine Room Under Cover")
Remove the front driveshaft assembly. Right side
(Refer to Driveshaft and Axle - "Front Driveshaft")
Transfer Assembly- Installation
To install, reverse the removal procedures.
WARNING
Be careful not to damage the O-ring (A). If the O-ring is
damaged, replace with a new one.
Smear and cover splines (B) with molybdenum type high pressure
grease.
GREASE SPL-1 eq
Driveshaft side oil seal # 1 B Type
Remove the transfer assembly.
(Refer to 4 Wheel Drive (4WD) System - "Front Wheel Transfer Assembly")
Remove the dust cover (A).
Remove the oil seal #1 (A).
Install the oil seal #1 (A) with a new one by using t
SEE MORE:
Suction & Liquid Pipe Assembly
Components
Suction & Liquid Pipe Assembly
Replacement
If a compressor is available, the air conditioner is operated for a few
minutes in the engine idle state and then
the engine is stopped.
Disconnect the negative (-) batte
IBU (Integrated Body Control Unit (IBU)
The IBU manages all function related to :
-"Start Stop Button (SSB) monitoring",
"Immobilizer communication" (with Engine Management System unit for
immobilizer release)
Authentication server" (Validity of Tran
Information
- Home
- Hyundai Tucson - Fourth generation (NX4) - (2020-2023) - Owner's Manual
- Hyundai Tucson - Fourth generation (NX4) - (2020-2023) - Workshop Manual
