Hyundai Tucson: Transfer Assembly- Removal
Removal
A Type
- Remove the engine room under cover.
(Refer to Engine Mechanical System - "Engine Room Under Cover")
- Remove the front driveshaft assembly. Right side
(Refer to Driveshaft and Axle - "Front Driveshaft")
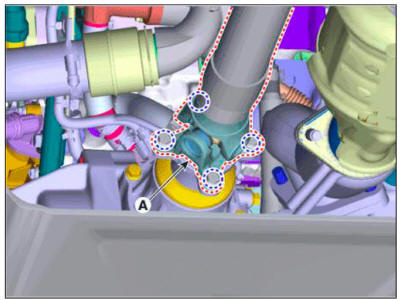
- Remove the front propeller shaft assembly (A) from the transfer assembly.
Tightening torque : 49.0 - 68.6 N.m (5.0 - 7.0 kgf.m, 36.2 - 50.6 lb-ft)
- Remove the transfer case assembly.
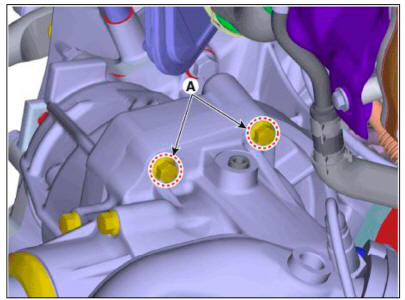
(1) Loosen the transafer assembly upper mounting bolts (A).
Tightening torque : 60.8 - 65.7 N.m (6.2 - 6.7 kgf.m. 44.8 - 48.5 lb-ft)
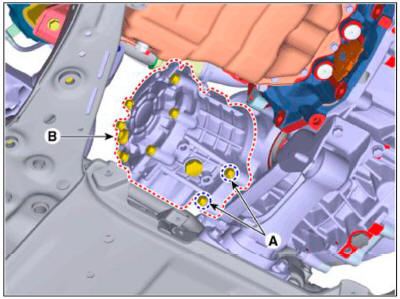
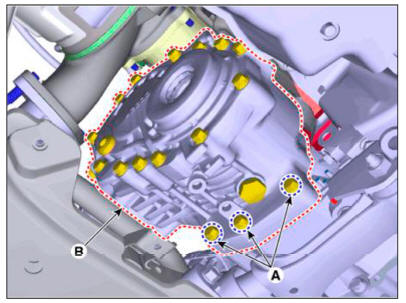
(2) Loosen the lower mounting bolts (A) and then removing the transfer case assembly (B).
Tightening torque : 60.8 - 65.7 N.m (6.2 - 6.7 kgf.m. 44.8 - 48.5 lb-ft)
B Type
- Remove the engine room under cover.
(Refer to Engine Mechanical System - "Engine Room Under Cover")
- Remove the front drive shaft assembly. Right side
(Refer to Driveshaft and Axle - "Front Driveshaft")
- Remove the front propeller shaft assembly (A) from the transfer assembly.
Tightening torque : 49.0 - 68.6 N.m (5.0 - 7.0 kgf.m, 36.2 - 50.6 lb-ft)

- Remove the transfer case assembly.
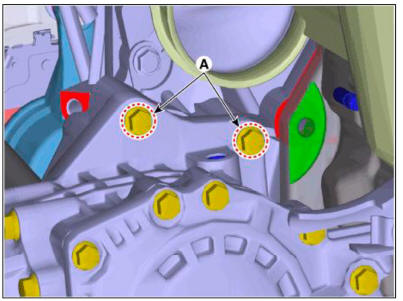
(1) Loosen the transafer assembly upper mounting bolts (A).
Tightening torque : 60.8 - 65.7 N.m (6.2 - 6.7 kgf.m. 44.8 - 48.5 lb-ft)
(2) Loosen the lower mounting bolts (A) and then removing the transfer case assembly (B).
Tightening torque : 60.8 - 65.7 N.m (6.2 - 6.7 kgf.m. 44.8 - 48.5 lb-ft)
READ NEXT:
 Transfer Assembly- Installation
To install, reverse the removal procedures.
WARNING
Be careful not to damage the O-ring (A). If the O-ring is
damaged, replace with a new one.
Smear and cover splines (B) with molybdenum type high pressure
grease.
GREASE SPL-1 eq
Driveshaft side oil seal # 1 B Type
Remove the transfer assembly.
(Refer to 4 Wheel Drive (4WD) System - "Front Wheel Transfer Assembly")
Remove the dust cover (A).
Remove the oil seal #1 (A).
Install the oil seal #1 (A) with a new one by using t
Driveshaft side oil seal #2 B Type
Remove the transfer assembly.
(Refer to 4 Wheel Drive (4WD) System - "Front Wheel Transfer Assembly")
Remove the dust cover (A).
Remove the oil seal #2 (A).
Install the oil seal #2 (A) with a new one by using t
SEE MORE:
Side View mirrors
Your vehicle is equipped with both lefthand
and right-hand side view mirrors.
The mirrors can be adjusted remotely
with the mirror adjustment control
switch. The side view mirrors can be
folded manually to help prevent damage
when going t
TPMS Receiver : BCM(body control module) integrated management
Description
Mode
(1) Virgin State
The receiver as a sole part is shipped in this state. Replacement parts
should therefore arrive
in this state.
In this state, there is no Auto-Location, no sensor wake-up, no sensor
monitorin
Information
- Home
- Hyundai Tucson - Fourth generation (NX4) - (2020-2023) - Owner's Manual
- Hyundai Tucson - Fourth generation (NX4) - (2020-2023) - Workshop Manual
