Hyundai Tucson: Transaxle mounting bracket
Hyundai Tucson - Fourth generation (NX4) - (2020-2023) - Workshop Manual / Engine Mechanical System / Engine And Transaxle Assembly / Transaxle mounting bracket
- Disconnect the negative battery terminal.
- Remove the engine room under cover.
(Refer to Engine and Transaxle Assembly - "Engine Room Under Cover")
- Remove the air duct and air cleaner assembly.
(Refer to Intake and Exhaust System - "Air Cleaner")
- Remove the battery and battery tray.
(Refer to Engine Electrical System - "Battery")
- Place the jack under the transaxle.
WARNING
Insert the rubber block between jack and transaxle
- Remove the LH front wheel guard.
(Refer to Body (Interior and Exterior) - "Front Wheel Guard")
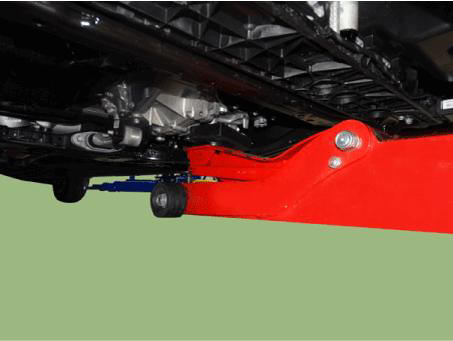
- Loosen the transaxle support bracket mounting bolts (A).
Tightening torque : 107.9 - 127.5 N.m (11.0 - 13.0 kgf.m, 79.6 - 94.0 lb-ft)

- Remove the transaxle mounting bracket (A).
Tightening torque : 63.7 - 83.4 N.m (6.5 - 8.5 kgf.m, 47.0 - 61.5 lb-ft)

- Installation is in the reverse order of removal.
READ NEXT:
 Roll rod bracket
Remove the engine room under cover.
(Refer to Engine and Transaxle Assembly - "Engine Room Under Cover")
Remove the roll rod bracket (A).
Tightening torque :
Bolt (B): 107.9 - 127.5 N.m (11.0 - 13.0 kgf.m, 79.6 - 94.0 lb-ft)
Air Cleaner Assembly
Removal and
Installation
Disconnect the battery negative terminal.
Disconnect the air flow sensor (AFS) connector (A).
Remove the air duct (A).
Disconnect the RCV hose (A).
Remove the air cleaner assembly
Tight
SEE MORE:
Rear Door - Glass Adjustment
WARNING
Check the glass run channel for damage or deterioration, and replace
them if necessary.
Remove the rear door trim.
(Refer to Rear Door - "Rear Door Trim")
Lower the glass by operating the power window switch until the gla
Diagnostic Procedure Using a Diagnostic
Instrument
The following section describes how to diagnose faults using a diagnostic
instrument.
Connect the diagnostic instalment to the self-diagnostic connector
(16-pin) beneath the crash pad on the side of driver's
seat, and then
Information
- Home
- Hyundai Tucson - Fourth generation (NX4) - (2020-2023) - Owner's Manual
- Hyundai Tucson - Fourth generation (NX4) - (2020-2023) - Workshop Manual
