Hyundai Tucson: Heater Pipe
- Disconnect the battery negative terminal.
- Remove the engine cover.
(Refer to Engine and Transaxle Assembly - "Engine Cover")
- Remove the engine room under cover.
(Refer to Engine and Transaxle Assembly - "Engine Room Under Cover")
- Drain the coolant.
(Refer to Cooling System - "Coolant")
- Remove the air duct and air cleaner assembly.
(Refer to Intake and Exhaust System - "Air Cleaner")
- Remove the battery and battery tray.
(Refer to Engine Electrical System - "Battery")
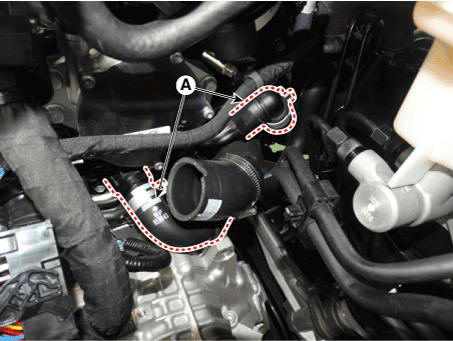
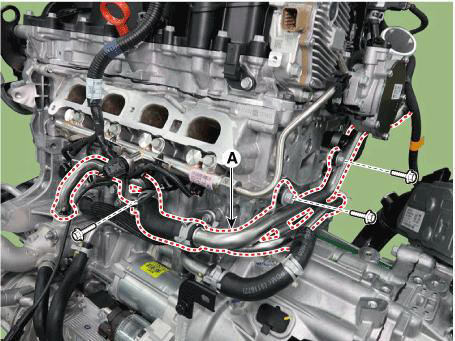
- Disconnect the heater hoses (A).
- Remove the integrated thermal management module (ITM).
- Remove the intake manifold.
(Refer to Intake and Exhaust System - "Intake Manifold")
- Remove the drive belt.
(Refer to Drive Belt System - "Drive Belt")
- Remove the mild hybrid starter generator (MHSG).
(Refer to Engine Electrical System - "Mild Hybrid Starter Generator (MHSG)")
- Disconnect the wiring connectors and harness clamps and remove the connector brackets around the heater pipe.
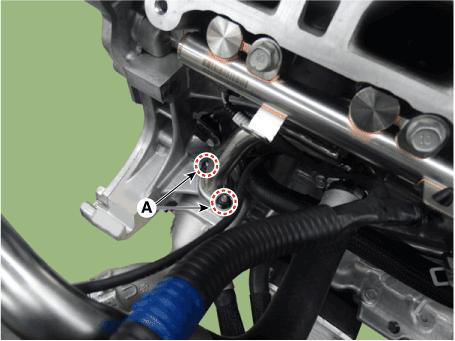
- Remove the heater pipe B mounting nuts (A)
Tightening torque : 9.8 - 11.8 N.m (1.0 - 1.2 kgf.m, 7.2 - 8.7 lb-ft)
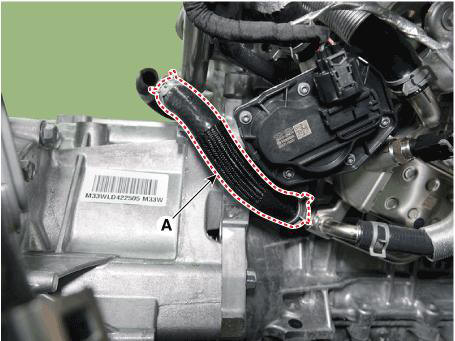
- Disconnect the heater outlet pipe hose (A).
- Disconnect the turbo charger coolant hose A (A).
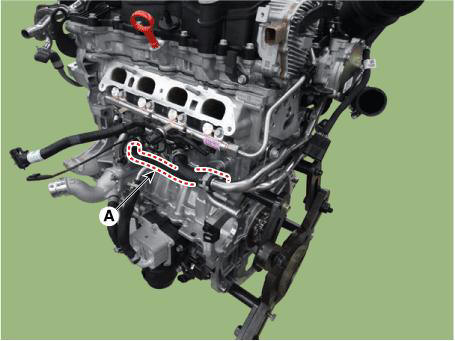
- Remove the heater pipe A and heater pipe B (A).
Tightening torque : Bolt (B) : 9.8 - 11.8 N.m (1.0 - 1.2 kgf.m, 7.2 - 8.7 lb-ft) Bolts (C) : 14.7 - 21.6 N.m (1.5 - 2.2 kgf.m, 10.8 - 15.9 lb-ft)
- Install in the reverse order of removal.
WARNING
- Always use a new integrated thermal management module (ITM) O-ring.
- When assembling the hose, Use a product with EPDM rubber stability.
- If a hose lubricant is applied, fill the coolant after 30 minutes of assembly.
- Place the hose at the specified location of the stopper and assemble them together. The front side of stoppers should be in close contact with the hose. And then, place the clamp at the correct location.
- Fill with engine coolant.
(Refer to Cooling System - "Coolant")
WARNING
The coolant must be injected according to the integrated thermal management module (ITM) coolant filling method.
- Start engine and check for leaks.
READ NEXT:
 Oil cooler pipe
Remove the heater pipe
Disconnect the oil cooler hose (A) from the ITM.
Disconnect the oil cooler hose (A) from the oil cooler.
Rmove the oil cooler pipe (A) after loosening the mounting bolts.
Tightening torque :
9.8 - 1
Water Inlet Fitting
Remove the engine room under cover.
(Refer to Engine and Transaxle Assembly - "Engine Room Under Cover")
Drain the coolant.
(Refer to Cooling System - "Coolant")
Disconnect the radiator lower hose (A).
Disconn
Troubleshooting
Trouble Symptom
Coolant
leakage
From the
bleed hole of
the water
pump
From gaskets
or bolts
From outer
surface of
water pump
Probable Cause
Visually
check
Check leaks
after about
ten-minute
warming up.
If co
SEE MORE:
When Ignition Key Is Turned ON (engine OFF), The ABS Warning Lamp Does Not
Light Up.
Detecting condition
When current flows in the HECU the ABS warning lamp turns from ON
to OFF as the initial check. Therefore if the lamp does not light up. the
cause may be an open in the lamp power supply circuit, a blown bulb, an
open in the bo
Cylinder Head Assembly- Installation
The hardening sealant located on the upper area between timing chain
cover and cam carrier, cylinder head
cover should be removed before assembling cylinder head cover.
Install the cylinder head cover.
(1) Install the new gasket.
WARNIN
Information
- Home
- Hyundai Tucson - Fourth generation (NX4) - (2020-2023) - Owner's Manual
- Hyundai Tucson - Fourth generation (NX4) - (2020-2023) - Workshop Manual
