Hyundai Tucson: Airbag Module - Removal
Removal
- Set the front tires straight-ahead.
- Disconnect the batteiy negative terminal.
WARNING
After disconnecting the cables, wait at least 3 minutes.
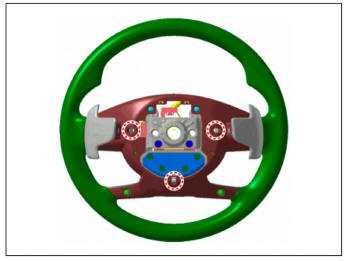
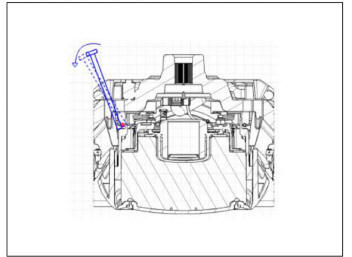
- Put a flat tool (05mm) into a guide hole located in the left/right of steering wheel and press a DAB fastening pin.
- Press both sides in hole order (regardless of left/right order)
- If the DAB removal does not go smoothly even after pressing twice, press the opposite hole again.
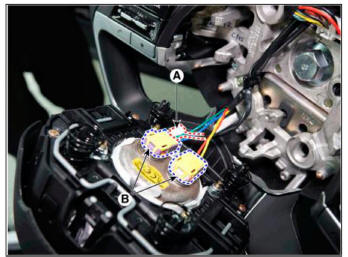
- Remove the airbag module from the steering wheel by disconnecting the horn connector (A) and airbag module connectors (B).
- Remove the steering wheel.
(Refer to Steering System - "Steering Wheel")
- Remove the steering column shroud lower panel.
(Refer to Body - "Steering Column Sliroud Panel")
- Remove the clock spring after disconnecting the clock spring connector (A) and horn connector (B).
Installation
- Set the front tires straight-ahead.
- Turn the ignition switch OFF.
- Disconnect the battery negative cable from the battery and wait for at least three minutes before beginning the work.
- Connect the clock spring harness connector and horn harness connector to the clock spring.
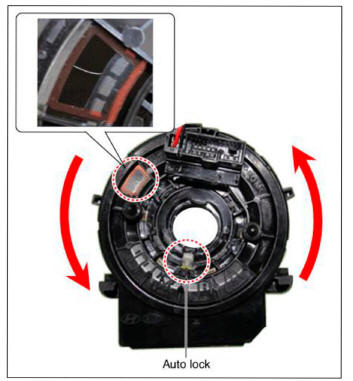
- Factory setting for the clock spring is neutral.
1) If white cable is visible through the product's 10 O' Clock Neutral Check Window, then the spring is at neutral.
2)If white cable is not visible through the product's 10 O' Clock Neutral Check Window, then manually adjust the setting to neutral.
Neutral Clieck Window : Normal
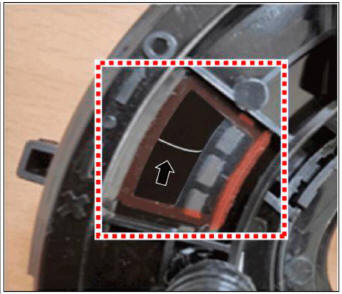
White cable is visible through 10 O' Clock Neutral Check Window
Neutral Check Window : Fault

White cable is not visible through 10 O' Clock Neutral Check Window
- Clock spring manual neutral setting procedure.
(1) Press the Auto Lock at 6 O' Clock and turn clockwise 3 rotations.
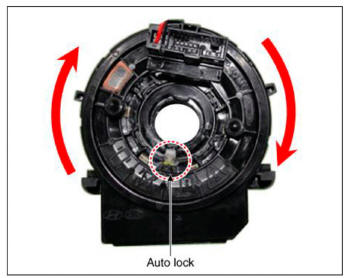
(2) Press the Auto Lock at 6 O' Clock and turn counter-clockwise 3 rotations.
(3) If white cable is visible through the 10 O' Clock Neutral Check Window, then the spring is set to neutral.
- Install the steering wheel column shroud and the steering wheel.
(Refer to Body - "Steering Column Shroud Panel")
- Install the steering wheel.
(Refer to Steering System - "Steering Wheel")
- Connect the Driver Airbag (DAB) module connector and horn connector, and then install the Driver Airbag (DAB) module on the steering wheel.
- Connect the battery negative cable.
- After installing the airbag, confirm proper system operation :
- Turn the ignition switch ON: the SRS indicator light should be turned on for about six seconds and then go off.
- Make sure horn button works.
Description
The passenger airbag (PAB) is installed inside the crash pad and protects the front passenger in the event of a frontal crash. The SRSCM determines if and when to deploy the PAB.
WARNING
Never attempt to measure the circuit resistance of the airbag module (squib) even if you are using a specified tester. If the circuit resistance is measured with a tester, accidental airbag deployment will result in serious personal injury.
READ NEXT:
 Passenger Air Bag (PAB)
Components Location
Passenger Air Bag (PAB)
Removal
Set the front tires straight-ahead.
Disconnect the batteiy negative terminal.
WARNING
After disconnecting the cables, wait at least 3 minutes.
Remove the glove box.
(Refe
Side airbag (SAB)
Components Location
Side airbag (SAB)
Removal
Disconnect the batteiy negative terminal.
WARNING
After disconnecting the cables, wait at least 3 minutes.
Remove the front seat back cover.
(Refer to Body - "Front Seat Back
Curtain Air Bag (CAB)
Components Location
Curtain Air Bag (CAB)
Removal
Disconnect the batteiy negative terminal.
WARNING
After disconnecting the cables, wait at least 3 minutes.
Remove the roof trim.
(Refer to Body - "Roof Trim Assembly"
SEE MORE:
Engine Coolant Temperature Sensor (ECTS)
Description
The Engine Coolant Temperature Sensor (ECTS) is located in the cylinder block
and cylinder head,
and measures the temperature of the engine coolant. The thermistor of the
cooling water temperature
and resistance has a negative temp
The DCT system
Components
Fork cover
Clutch actuator & TCM assembly
Clutch actuator assembly
O-ring
DCT control module (TCM)
Specification
Inspection
The DCT system can be more quickly diagnosed for troubles by using the
vehicle diagn
Information
- Home
- Hyundai Tucson - Fourth generation (NX4) - (2020-2023) - Owner's Manual
- Hyundai Tucson - Fourth generation (NX4) - (2020-2023) - Workshop Manual
