Hyundai Tucson: Release Residual Pressure in Fuel Line
WARNING
There may be some residual pressure even after "Release Residual Pressure in Fuel Line" work, so cover the hose connection with a shop towel to prevent residual fuel from spilling out before disconnecting any fuel connection.
- Turn the ignition switch OFF and disconnect the battery (-) cable.
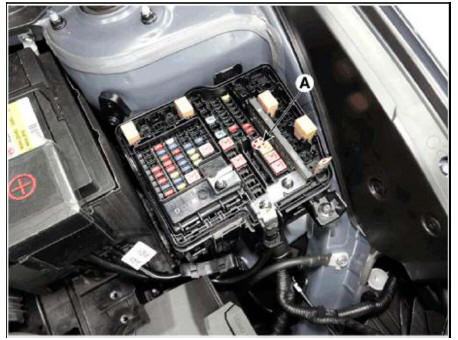
- Remove the fuel pump fuse (A).
WARNING
When removing the fuel pump relay, the Diagnostic Trouble Code (DTC) will be occurred.
Therefore delete the code with the diagnostic tool after "Release Residual Pressure in Fuel Line" work.
- Connect the battery (-) cable.
- Start the engine and let idle, and then turn the ignition switch OFF after the engine has stopped on its own.
- Disconnect the battery (-) cable, and then install the fuel pump relay (A).
- Connect the battery (-) cable.
- Delete the Diagnostic Trouble Code (DTC) related the fuel pump relay with the diagnostic tool.
Removal
WARNING
Be careful not to damage the parts located under the vehicle (floor under cover, canister, fuel tank) when raising the vehicle using the lift.
(Refer to General Information - "Lift and Support Points")
- Release the residual pressure in fuel line.
(Refer to Fuel Delivery System - "Release Residual Pressure in Fuel Line")
- Turn the ignition switch OFF and disconnect the batteiy (-) terminal.
- Remove the rear seat cushion.
(Refer to Body - "Rear Seat Assembly")
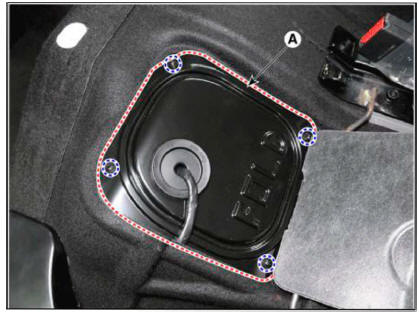
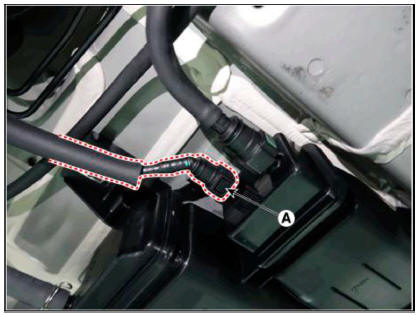
- Remove the fuel pump service cover (A) after loosening the screw.
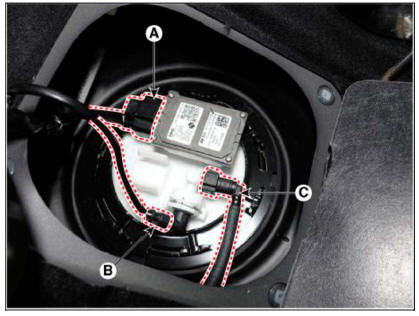
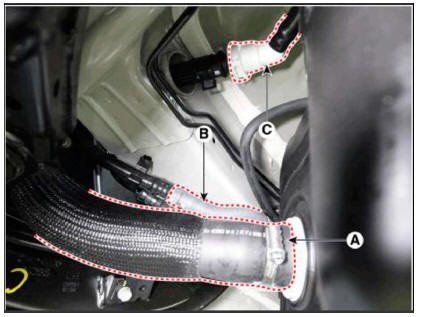
- Disconnect the Fuel Pump Control Module (FPCM) connector (A).
- Disconnect the Fuel Pressure Sensor (FPS) connector (B).
- Disconnec the fuel feed tube quick-connector (C).
- Lift the vehicle.
- Remove the propeller shaft assembly 4WD.
(Refer to Driveshaft and Axle - "Propeller shaft Assembly")
- Remove the center muffler.
(Refer to Engine Mechanical System - "Muffler")
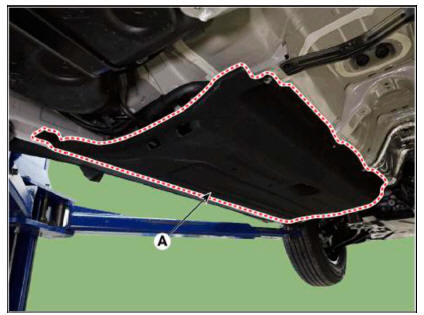
- Remove the floor under cover (A).
Tightening torque : 7.9 - 11.8 N m (0.8 - 1.2 kgf m, 5.8 - 8.7 lb ft)
- Separate the fuel filler hose (A).
- Separate the fuel ventilation hose (B) and then remove the fixing clip (D).
- Disconnect the levelling hose quick-connector (C).
- Disconnect the vapor hose quick-connector (A).
- Support the fuel tank with a jack (A).

WARNING
Insert the rubber block between the fuel tank and jack to prevent damage to the fuel tank.
- Remove the fuel tank (B) after loosening the mounting bolt (A).
Tightening Torque : 39.2 - 53.9 N.m (4.0 - 5.5 kgf.m, 28.9 - 39.8 lb-ft)

Installation
- Install in the reverse order of removal.
READ NEXT:
 Fuel pump service
Inspection
Turn the ignition switch OFF and disconnect the battery (-) terminal.
Remove the fuel pump assembly.
(Refer to - "Removal" Procesures)
Using an ohmmeter, measure the resistance between terminals 1 and 6 of
sender
Fuel pump service -
Installation
Installation
Install in the reverse order of removal.
Removal
Remove the fuel pump.
(Refer to Fuel Delivery System - "Fuel Pump")
Disconnect the fuel sender connector (A).
Release the fixing hook (A) and then remo
Low Pressure Fuel Line
WARNING
Be careful not to damage the parts located under the vehicle (floor
under cover, canister, fuel tank) when
raising the vehicle using the lift.
(Refer to General Information - "Lift and Support Points")
Release the residua
SEE MORE:
Door step trim
Component Location
Front door step trim
Rear door step trim
Replacement
WARNING
When piying with a flat-tip screwdriver, wrap it with
protective tape, and apply protective tape
around the related parts, to prevent damage.
Put
Interior Antenna
Interior 1 Antenna
Take care not to scratch the crash pad and related parts.
Disconnect the negative (-) battery terminal.
Remove the ecall unit.
(Refer to Emergency Call system - "Emergency Call (eCall) Unit")
Remove the inter
Information
- Home
- Hyundai Tucson - Fourth generation (NX4) - (2020-2023) - Owner's Manual
- Hyundai Tucson - Fourth generation (NX4) - (2020-2023) - Workshop Manual
