Hyundai Tucson: Propeller Shaft Assembly
Hyundai Tucson - Fourth generation (NX4) - (2020-2023) - Workshop Manual / Driveshaft and axle / Propeller Shaft Assembly
Components
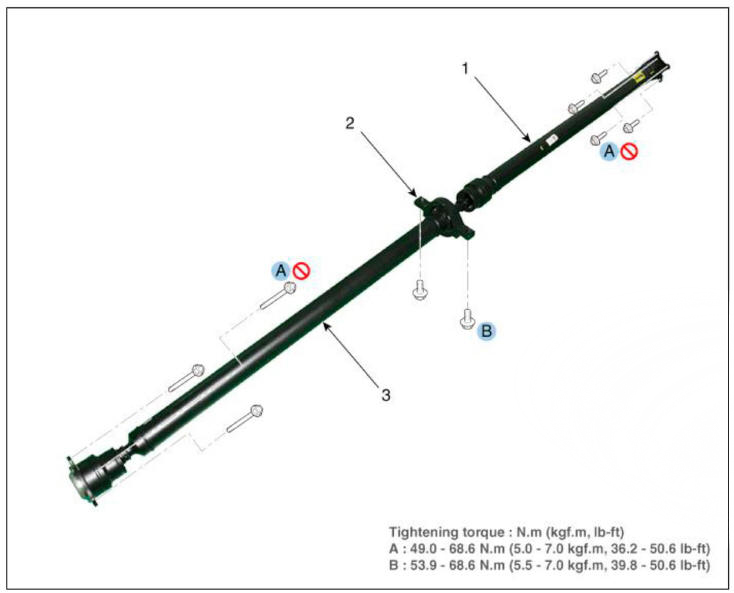
- Front propeller shaft
- Center bearing bracket
- Rear propeller shaft
Removal
WARNING
When lifting a vehicle using a lift, be careful not to damage the lower parts of the vehicle (floor under cover, fuel filter, fuel tank, canister).
(Refer to General Information - "Lift Point")
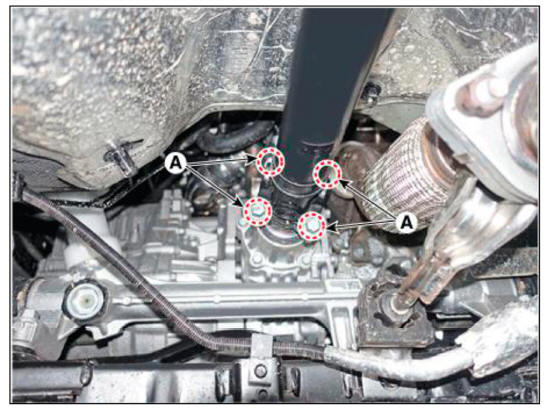
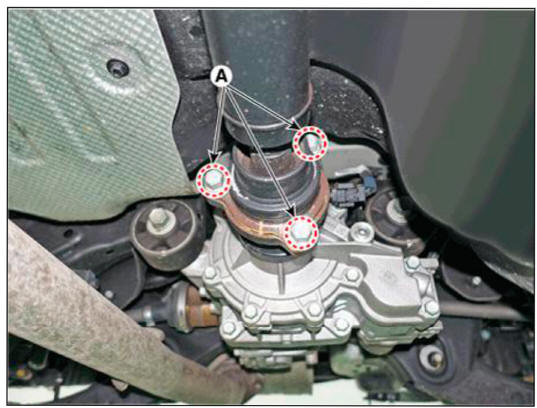
- After making a match mark 011 the flange yoke and transaxle companion, remove the propeller shaft mounting bolts (A).
Tightening torque : 49.0 - 68.6 N.m(5.0 - 7.0 kgf.m, 36.2 - 50.6 lb-ft)
WARNING
- Use a hexagon socket to prevent damage to the head when removing and installing bolts.
- Mark the location and direction of bolt and washer before removing the propeller shaft.
- Installing the bolt and washer differently from the initial state can result in unbalanced propeller shaft causing abnormal vibration of propeller shaft at high speed.
- If abnormal vibration and noise occur at high vehicle speeds after replacing propeller shaft with a new one, balance the propeller shaft with a balancing machine.
- The bolt is a special bolt applied with bond, so do not reuse.
- Remove the bracket (A) after loosening the mounting bolts.
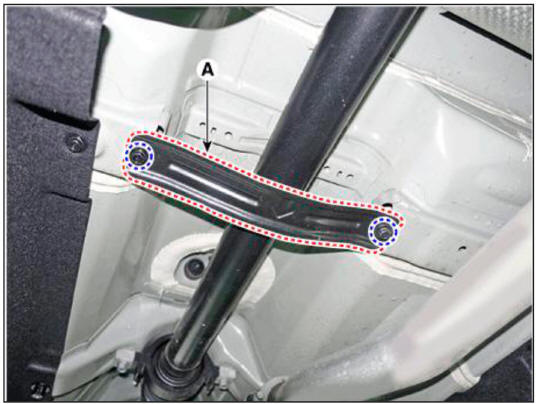
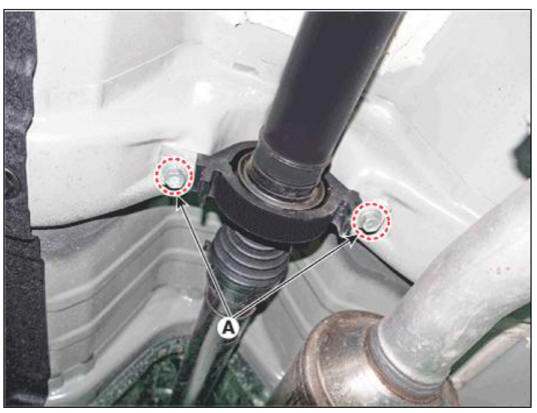
- Loosen the center bearing bracket mounting bolts (A).
Tightening torque : 49.0 - 68.6 N.m(5.0 - 7.0 kgf.m, 36.2 - 50.6 Ib-ft)
WARNING
- Mark the location and direction of bolt and washer before removing the propeller shaft.
- Installing the bolt and washer differently from the initial state can result in unbalanced propeller shaft causing abnormal vibration of propeller shaft at high speed.
- After making a match mark on the constant velocity joint and rear differential companion, remove the propeller shaft mounting bolts (A).
Tightening torque : 49.0 - 68.6 N.m(5.0 - 7.0 kgf.m, 36.2 - 50.6 Ib-ft)
WARNING
- Use a hexagon socket to prevent damage to the head when removing and installing bolts.
- Mark the location and direction of bolt and washer before removing the propeller shaft.
- Installing the bolt and washer differently from the initial state can result in unbalanced propeller shaft causing abnormal vibration of propeller shaft at high speed.
- If abnormal vibration and noise occur at high vehicle speeds after replacing propeller shaft with a new one, balance the propeller shaft with a balancing machine.
- The bolt is a special bolt applied with bond, so do not reuse.
Installation
- To install, reverse the removal procedures.
READ NEXT:
 Differential Carrier Assembly - Removal
Components Location
Rear differential carrier assembly
Rear driveshaft assembly
Coupling Assembly
Propeller shaft assembly
Components
Pinion lock nut
Oil seal (pinion side)
Pinion outer bearing
Oil seal (case side)
Pa
Differential gear assembly
Remove the drain plug packing (A) and drain plug (B) to drain the gear
oil.
Loosen the differential side cover mounting bolts.
Widen the gap between the side cover and the case to remove the side
cover (A).
Remo
SEE MORE:
Intermittent Problem Inspection Procedure
Sometimes the most difficult case in troubleshooting is when a problem
symptom occurs but does not occur again during
testing. An example would be if a problem appears only when the vehicle is cold
but has not appeared when warm. In this
case,
Cylinder head cover
Removal
Disconnect the battery negative terminal.
Remove the cylinder head cover.
(Refer to Cylinder Head Assembly - "Cylinder Head Cover")
Turn the crankshaft damper pulley so that No. 1 piston is at top dead
center.
(1)
Information
- Home
- Hyundai Tucson - Fourth generation (NX4) - (2020-2023) - Owner's Manual
- Hyundai Tucson - Fourth generation (NX4) - (2020-2023) - Workshop Manual
