Hyundai Tucson: Oil Temperature Sensor (OTS)
Description
It generates the oil pressure and temperature information (output voltage) to control the pump operation proportional control valve in variable oil pump system.
It measures the oil pressure and temperature discharged from the oil pump and transmits the pressure information to ECM. The ECM controls the proportional control valve to regularly keep the discharged pressure depending on RPM.
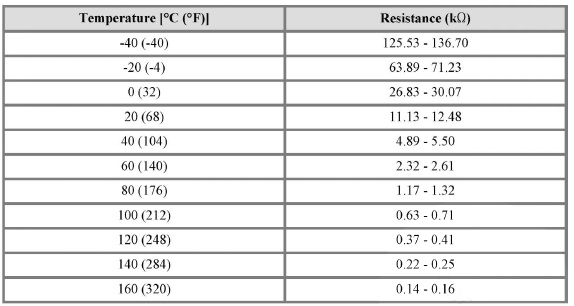
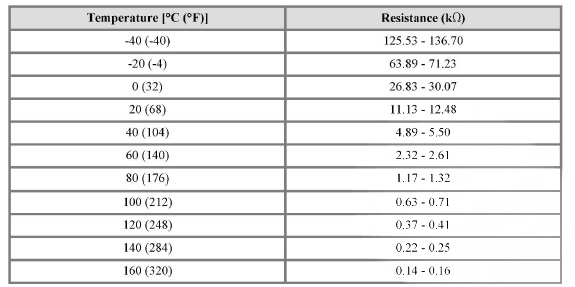
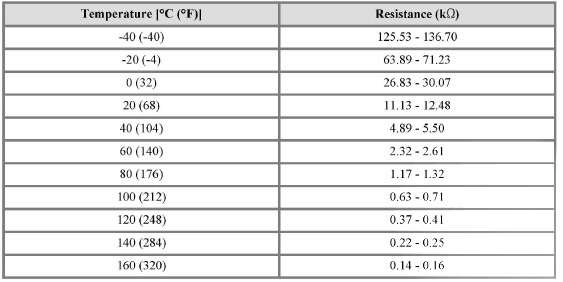
Specification
Circuit Diagram
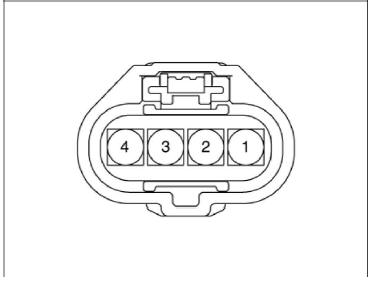
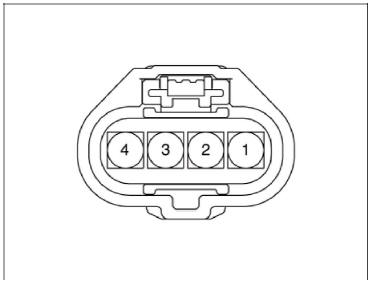
Harness Connector
Inspection
- Turn ignition switch OFF.
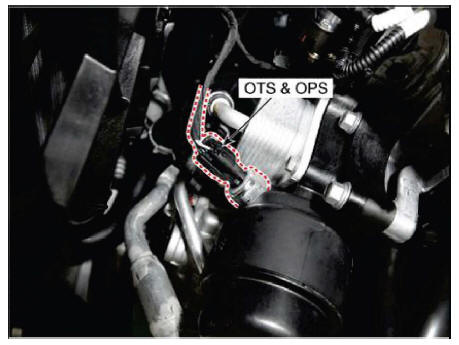
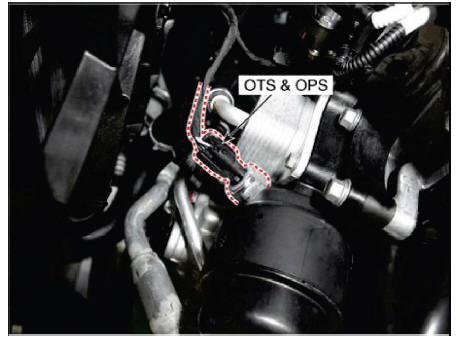
- Remove the oil pressure & oil temperature sensor.
(Refer to - "Removal")
- After immersing the thermistor of the sensor into engine coolant, measure resistance between the OTS terminals 1 and 4.
- Check that the resistance is within the specification.
Removal
- Turn the ignition switch OFF and disconnect the battery negative (-) cable.
- Lift the vehicle.
- Remove the engine room under cover.
(Refer to Engine Mechanical System - "Engine Room Under Cover")
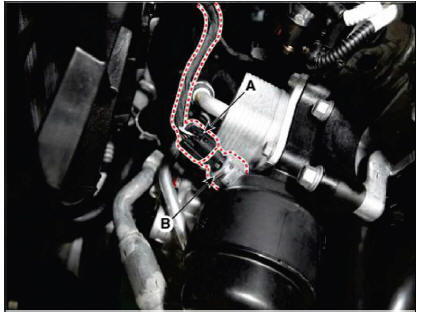
- Disconnect the oil pressure & oil temperature sensor connector (A), and then remove the oil pressure & oil temperature sensor (B).
Tightening Torque : 14.7 - 21.6 N.m (1.5 - 2.2 kgf.m, 10.8 - 15.9 lb-ft)

Installation
WARNING
- Install the component to the specified torques.
- Note that internal damage may occur when the component is dropped. In this case, use it after inspecting.
- Apply the sealant to the sensor.
- Insert the sensor in the installation hole and be careful not to damage it during installation.
- Install in the reverse order of removal.
Description
It generates the oil pressure and temperature information (output voltage) to control the pump operation proportional control valve in variable oil pump system.
It measures the oil pressure and temperature discharged from the oil pump and transmits the pressure information to ECM. The ECM controls the proportional control valve to regularly keep the discharged pressure depending on RPM.
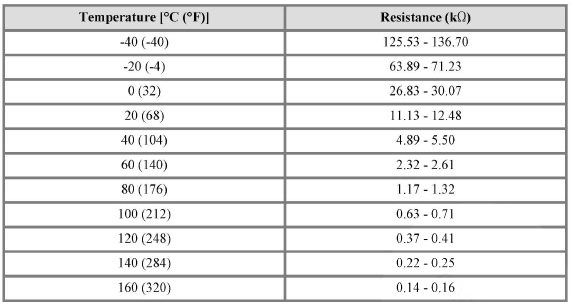
Specifications
Circuit Diagram

Harness Connector
Inspection
- Turn ignition switch OFF.
- Remove the oil pressure & oil temperature sensor.
(Refer to - "Removal")
- After immersing the thermistor of the sensor into engine coolant, measure resistance between the OTS terminals 1 and 4.
- Check that the resistance is within the specification.
Removal
- Turn the ignition switch OFF and disconnect the battery negative (-) cable.
- Lift the vehicle.
- Remove the engine room under cover.
(Refer to Engine Mechanical System - "Engine Room Under Cover")
- Disconnect the oil pressure & oil temperature sensor connector (A), and then remove the oil pressure & oil temperature sensor (B).
Tightening Torque : 14.7 - 21.6 N.m (1.5 - 2.2 kgf.m, 10.8 - 15.9 lb-ft)
Installation
WARNING
- Install the component to the specified torques.
- Note that internal damage may occur when the component is dropped. In this case, use it after inspecting.
- Apply the sealant to the sensor.
- Insert the sensor in the installation hole and be careful not to damage it during installation.
- Install in the reverse order of removal.
READ NEXT:
 Rail Pressure Sensor (RPS)
Description
Installed on the delivery pipe, the Rail Pressure Sensor (RPS) measures the
instantaneous fuel pressure
in the delivery pipe. The sensing element (Semiconductor element) built in the
sensor converts the
pressure to voltage signal.
Injector - Description
The GDI injector is similar to a standard injector, but sprays fuel at a much
higher pressure directly
into the combustion chamber and has a swirl disc to get the fuel swirling as it
exits the nozzle. This
aids in atomization of the fuel.
Th
SEE MORE:
IMT System Actuator- Replacement
iMT system actuator fluid - when fluid suction tool is available
Remove the air cleaner assembly and the air duct.
(Refer to Engine Mechanical System - "Air Cleaner")
Remove the reservoir cap (A) and drain the imt system actuator
Monitor cover
Remove the front monitor lower cover after disconnecting the mood lamp
connector
Remove front monitor side cover (A) and (B).
Remove the front monitor assembly (A).
Remove the front monitor assembly (A) aft
Information
- Home
- Hyundai Tucson - Fourth generation (NX4) - (2020-2023) - Owner's Manual
- Hyundai Tucson - Fourth generation (NX4) - (2020-2023) - Workshop Manual
