Hyundai Tucson: Oil Pump Chain
- Disconnect the battery negative terminal.
- Remove the timing chain.
(Refer to Timing System - "Timing Chain")
- Remove the oil pump chain tensioner (A).
Tightening torque : 9.8 - 11.8 N.m (1.0 - 1.2 kgf.m, 7.2 - 8.7 lb-ft)
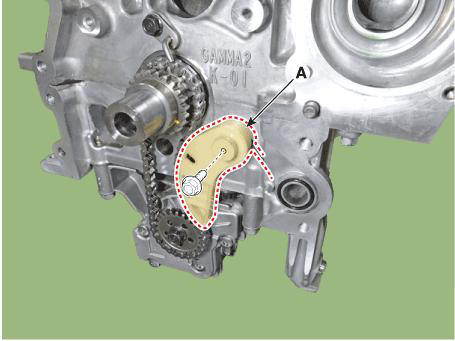
- Remove the oil pump chain (A).

- Install in the reverse order of removal.
- Refill engine oil.
(Refer to Lubrication System - "Engine Oil")
Removal and Installation
- Disconnect the battery negative terminal.
- Disconnect the oil pressure control solenoid valve connector (A).
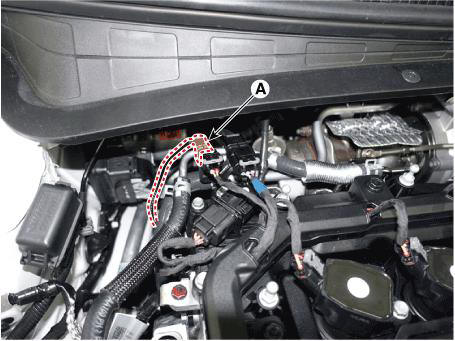
- Remove the engine room under cover.
(Refer to Engine and Transaxle Assembly System - "Engine Room Under Cover")
- Remove the oil pressure control solenoid valve (A) after loosening the bolt and disconnecting the wiring fastener.
Tightening torque : 9.8 - 11.8 N.m (1.0 - 1.2 kgf.m, 7.2 - 8.7 lb-ft)
WARNING
When installing, apply engine oil to the O-ring.
- Install in the reverse order of removal.
READ NEXT:
 Repair procedures
Compession Pressure Inspection
WARNING
If the there is lack of power, excessive oil consumption or poor
fuel economy, measure the compression
pressure.
Start the engine and turn the coolant temperature to 80 - 95 ºC and stop.
Remove the
Timing System - Replacement
Components
Variable force solenoid valves
Timing chain cover
Cam to cam guide
Timing chain
Timing chain tensioner arm
Timing chain tensioner arm
Timing chain tensioner
Crankshaft sprocket
Oil pump chain
Oil pump chain tensio
SEE MORE:
Engine compartment
„Smartstream G2.5 GDI
The actual engine compartment in the vehicle may differ from the
illustration
Engine coolant reservoir
Brake fluid reservoir
Air cleaner
Engine oil dipstick
Engine oil filler cap
Windshield washer fluid
Cup holder
Cups or small beverages cups may be
placed in the cup holders.
WARNING
Avoid abrupt starting and braking
when the cup holder is in use to
prevent spilling your drink. If hot
liquid spills, you could be burned.
Such a burn to the drive
Information
- Home
- Hyundai Tucson - Fourth generation (NX4) - (2020-2023) - Owner's Manual
- Hyundai Tucson - Fourth generation (NX4) - (2020-2023) - Workshop Manual
