Hyundai Tucson: Timing System - Replacement
Components
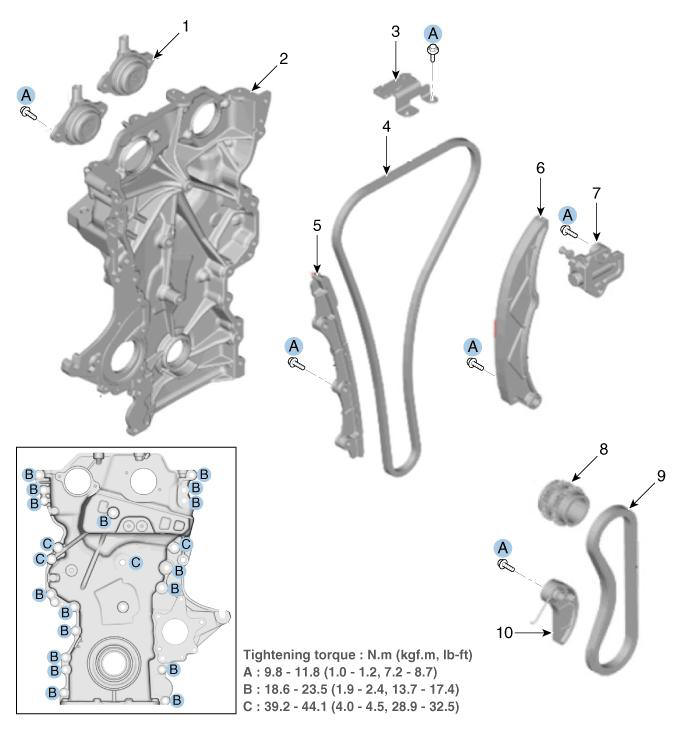
- Variable force solenoid valves
- Timing chain cover
- Cam to cam guide
- Timing chain
- Timing chain tensioner arm
- Timing chain tensioner arm
- Timing chain tensioner
- Crankshaft sprocket
- Oil pump chain
- Oil pump chain tensioner
Replacement
- Remove the crankshaft damper pulley.
(Refer to Drive Belt System - "Crankshaft Damper Pulley")
- Remove the front oil seal (A).
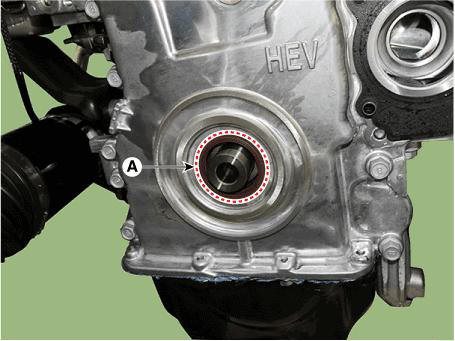
- Apply engine oil to a new oil seal lip & outer surface.
WARNING
Remove any debris from the lip portion of the oil seal.
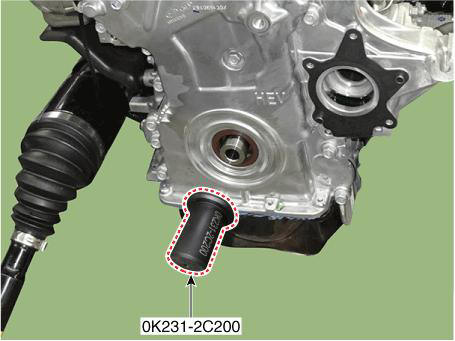
- Using the SST (0K231-2C200), install a new front oil seal.
WARNING
- Always use a new front oil seal.
- Install in the reverse order of removal.
Timing System - Removal
WARNING
- Use fender covers to avoid damaging painted surfaces.
- To avoid damage, unplug the wiring connectors carefully while holding the connector portion.
WARNING
Mark all wiring and hoses to avoid misconnection.
- Disconnect the battery negative terminal.
- Remove the engine room under cover, and then drain the engine coolant.
(Refer to Cooling System - "Coolant")
- Drain the engine oil.
(Refer to Lubrication System - "Engine Oil")
- Remove the drive belt, and then remove the drive belt tensioner.
(Refer to Drive Belt System - "Drive Belt Tensioner")
- Remove the hybrid starter generator (HSG).
(Refer to Engine Electrical System - "Mild Hybrid Starter Generator (MHSG)")
- Remove the crankshaft damper pulley.
(Refer to Drive Belt System - "Crankshaft Damper Pulley")
- Remove the oil pan.
(Refer to Lubrication System - "Oil Pan")
- Remove the cylinder head cover.
(Refer to Cylinder Head Assembly - "Cylinder Head Cover")
- Insert the rubber block between jack and lower crankcase.
WARNING
Insert the rubber block between jack and lower crankcase to prevent damage to parts
- Remove the engine mounting support bracket.
(Refer to Engine And Transaxle Assembly - "Engine Mounting")
- Remove the water pump.
(Refer to Cooling System - "Water Pump")
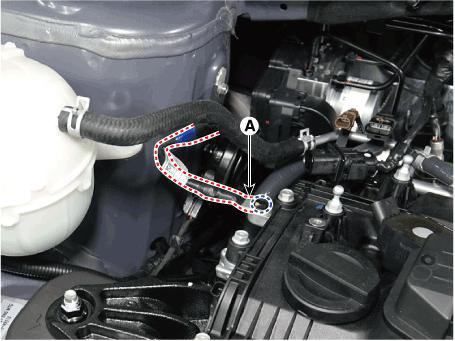
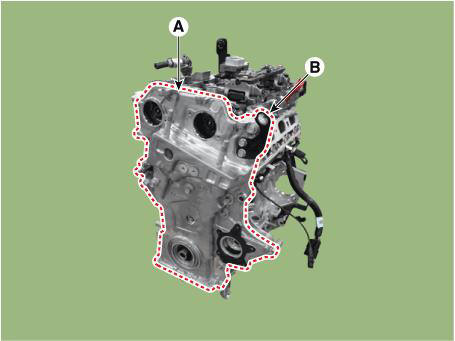
- Disconnect the engine ground cable (A) from the timing chain cover.
Tightening torque : 6.8 - 9.8 N.m (0.7 - 1.0 kgf.m, 5.1 - 7.2 lb-ft)
- Loosen the turbo charger coolant hose and pipe mounting bolts (A).
Tightening torque : 9.8 - 11.8 N.m (1.0 - 1.2 kgf.m, 7.2 - 8.7 lb-ft)

- Remove the intake and exhaust variable force solenoid (VFS) valves (A).
Tightening torque : 9.8 - 11.8 N.m (1.0 - 1.2 kgf.m, 7.2 - 8.7 lb-ft)
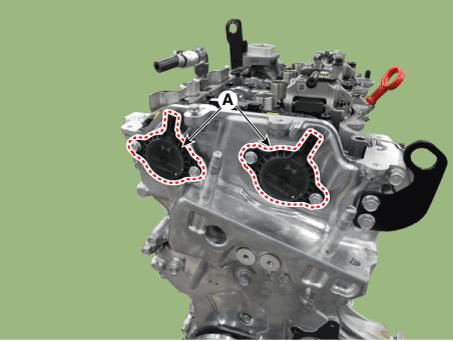
WARNING
The variable force solenoid (VFS) must be removed before removing the timing chain cover.
- Remove the timing chain cover (A) and hanger (B).
READ NEXT:
 Timing System - Installation
Keep the liquid gasket sealing surfaces (timing chain cover, cylinder
head, cam carrier, cylinder block, lower
crankcase) free from foreign matters, cured sealant, oil, dust, moisture and
etc. Spray the cleaner on the sealing
surface and
Timing System -
Removal
Disconnect the battery negative terminal.
Turn the crankshaft damper pulley clockwise, and align its groove with
the timing mark of the timing chain
cover.
Remove the timing chain cover.
(Refer to Timing System - "Timing C
Timing System - Installation
Install the crankshaft sprocket (A).
Place the crankshaft key at the left 180º.
Install the oil pump chain.
(Refer to Lubrication System - "Oil Pump")
Install the timing chain (A).
WARNING
When in
SEE MORE:
Power Tailgate Module - Component Location
Buzzer
Tailgate open switch (Crsah pad lower switch)
Fob key
Spindle Drive (2EA)
Tailgate inner switch
Power Latch
PTG Control Module
Tailgate Inner Switch
Failure Inspection
Diagnosis with diagnostic tool
In the body elec
Intermittent Problem Inspection Procedure
Sometimes the most difficult case in troubleshooting is when a problem
symptom occurs but does not occur again during
testing. An example would be if a problem appears only when the vehicle is cold
but has not appeared when warm. In this
case,
Information
- Home
- Hyundai Tucson - Fourth generation (NX4) - (2020-2023) - Owner's Manual
- Hyundai Tucson - Fourth generation (NX4) - (2020-2023) - Workshop Manual
