Hyundai Tucson: Floor Carpet
Replacement
WARNING
- When removing with a flat-tip screwdriver or remover, wrap protective tape around the tools to prevent damage to components.
- Put on gloves to prevent hand injuries.
WARNING
Take care not to bend or scratch the trim and panels.
- Remove the floor console assembly.
(Refer to Floor Console - "Floor Console Assembly")
- Remove the front seat assembly.
(Refer to Front Seat - "Front Seat Assembly")
- Remove the rear seat cushion assembly.
(Refer to Rear Seat - "Rear Seat Assembly")
- Remove the cowl side trim.
(Refer to Interior Trim - "Cowl Side Trim")
- Remove the center pillar lower trim.
(Refer to Interior Trim - "Center Pillar Trim")
- Remove the luggage side trim.
(Refer to Trunk Trim - "Luggage Side Trim")
- Remove the accelerator pedal module.
(Refer to Fuel system - "accelerator pedal")
- Remove the front floor carpet (A).
- Remove the rear floor carpet (B).
- To install, reverse removal procedure.
WARNING
Replace any damaged clips (or pin-type retainers).
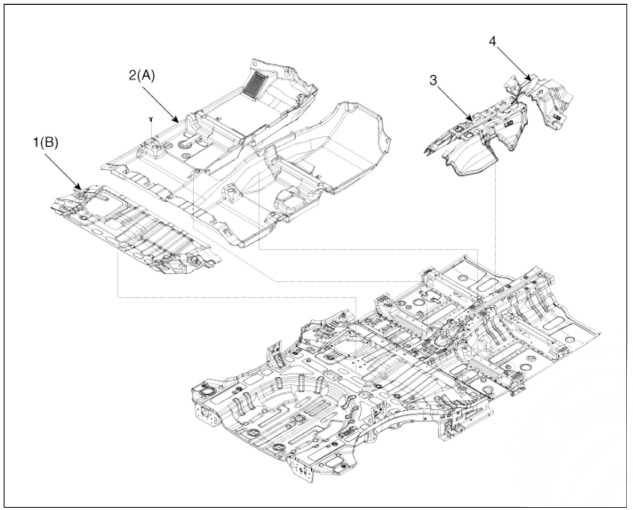
- Rear floor carpet
- Front floor carpet
- Rear tunnel pad
- Front tunnel pad
READ NEXT:
 Front Bumper - Replacement
Components
Front bumper assembly
Front bumper side bracket
Component Location
Front bumper assembly
Replacement
WARNING
When removing with a flat-tip screwdriver or remover, wrap
protective tape around the tools to
p
Radiator grill
Component Location
Radiator grill
Replacement
WARNING
When removing with a flat-tip screwdriver or remover, wrap
protective tape around the tools to
prevent damage to components.
Put on gloves to prevent hand injuries.
WARNI
SEE MORE:
Cylinder Head
Inspect for flatness.
Using a precision straight edge and feeler gauge, measure the contacting
surface of the cylinder block and the
manifolds for warpage
Flatness of cylinder head gasket surface:
Less than 0.05 mm (0.0020 in.) fo
Engine mounting bracket
Remove the engine room under cover.
(Refer to Engine and Transaxle Assembly - "Engine Room Under Cover")
Install the jack to the edge of oil pan.
WARNING
Insert the rubber block between jack and oil pan.
Remove the eng
Information
- Home
- Hyundai Tucson - Fourth generation (NX4) - (2020-2023) - Owner's Manual
- Hyundai Tucson - Fourth generation (NX4) - (2020-2023) - Workshop Manual
