Hyundai Tucson: ESC Control unit (HECU)
Hyundai Tucson - Fourth generation (NX4) - (2020-2023) - Workshop Manual / Brake System / ESC (Electronic Stability Control) System / ESC Control unit (HECU)
Components

- Front - right (FR)
- Rear - left (RL)
- Rear - right (RR)
- Front - left (FL)
- MC2
- MCI
- ESC Control unit (HECU) connector
- Bracket
ESC Control unit (HECU)- Removal
Removal
- Disconnect the battery negative ( - ) terminal.
- Remove the glow relay unit assembly. U 1.6 (Refer to Engine Electrical System - "Glow Relay Unit Assembly")
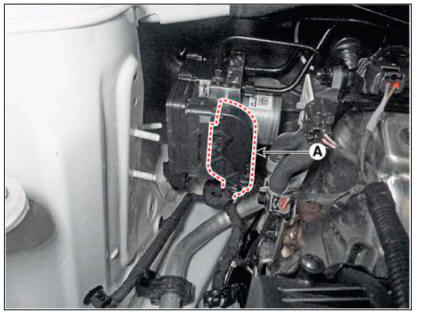
- Pull up the lock of the ESC control unit (HECU) connector and then disconnect the connector (A).
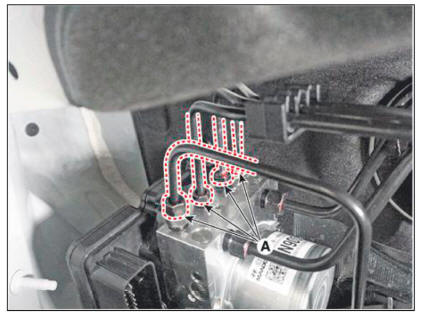
- Separate the brake mbe by removing the flare nuts (A), (B) connected to the ESC control unit (HECU).
Tightening torque :
(A): 13.7 - 16.7 N m (1.4 - 1.7 kgfrn. 10.1 - 12.3 lb ft)
(B) : 18.6 - 22.6 N m (1.9 - 2.3 kgfrn, 13.7 - 16.6 lb ft)
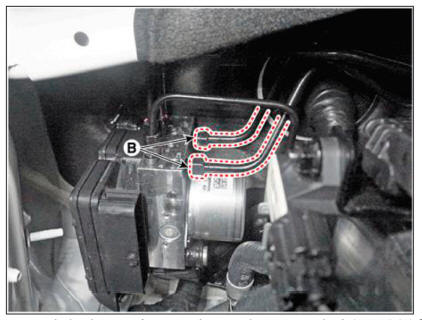
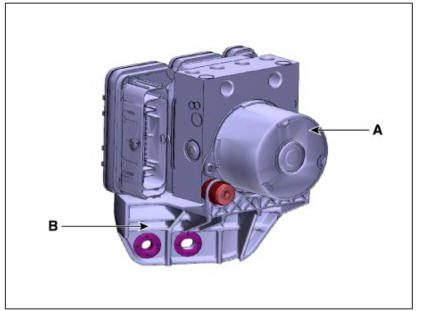
- Remove the bracket mounting nuts and remove the ESC control unit (HECU) (A) from the vehicle.
Tightening torque : 16.7 - 25.5 N m (1.7 - 2.6 kgfm, 12.3 - 18.8 lb ft)

- Remove the bolts to remove the bracket (B) from the ESC control unit (HECU) (A).
Installation
- Install in the reverse order of removal.
- After installation, bleed the brake system.
(Refer to Brake System - "Brake Bleeding Procedures")
- Conduct the Variant Coding.
- Conduct the Auto Detected Sensor Calibration.
- Conduct the Longitudinal G Sensor Calibration.
- After replacing the ESC control unit execute the "Assembly Check (ECU replacement)" of the additional function to check that the mounting is successful.
READ NEXT:
 ESC Control unit (HECU) - Adjustment
Adjustment
Perform diagnostic procedure by using diagnostic device as shown below :
Connect self-diagnosis connector (16pins) located under the driver side
crash pad to self-diagnosis device, and then torn the
self-diagnosis device after ke
Front wheel speed sensor/ Front wheel speed sensor connector
Components
Front wheel speed sensor
Front wheel speed sensor connector
Removal
Loosen the wheel nuts slightly.
Raise the vehicle, and make sure it is securely supported.
Remove the front wheel and tire (A) from the front hub.
Rear wheel speed sensor
Components
2WD
Rear wheel speed sensor
4WD
Rear wheel speed sensor
Rear wheel speed sensor- Removal- 2WD
Removal
2WD
Loosen the wheel nuts slightly.
Raise the vehicle, and make sure it is securely supported.
Remove th
SEE MORE:
Transfer Assembly- Installation
To install, reverse the removal procedures.
WARNING
Be careful not to damage the O-ring (A). If the O-ring is
damaged, replace with a new one.
Smear and cover splines (B) with molybdenum type high pressure
grease.
GREASE SPL-1 eq
Brake Tube- Replacement
Replacement
WARNING
Be careful not to damage the parts located under the vehicle (floor
under cover, fuel filter, fuel
tank and canister) when raising the vehicle using the lift.
(Refer to General Information - "Lift and Support Points&q
Information
- Home
- Hyundai Tucson - Fourth generation (NX4) - (2020-2023) - Owner's Manual
- Hyundai Tucson - Fourth generation (NX4) - (2020-2023) - Workshop Manual
