Hyundai Tucson: Clutch Cover And Disc- Removal
Hyundai Tucson - Fourth generation (NX4) - (2020-2023) - Workshop Manual / Clutch System / Clutch Cover And Disc / Clutch Cover And Disc- Removal
- Remove the manual transaxle assembly.
(Refer to In case by Gasoline 1.6 T-GDI System - "Manual Transaxle")
(Refer to In case by Diesel 1.6 TCI System - "Manual Transaxle")
(Refer to In case by Gasoline 2.0 MPI System - "Manual Transaxle")
(Refer to In case by Gasoline 1.6 T-GDI System - "Intelligent Manual Transaxle")
(Refer to In case by Diesel 1.6 TCI System - "Intelligent Manual Transaxle")
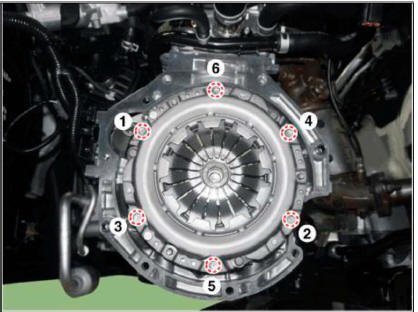
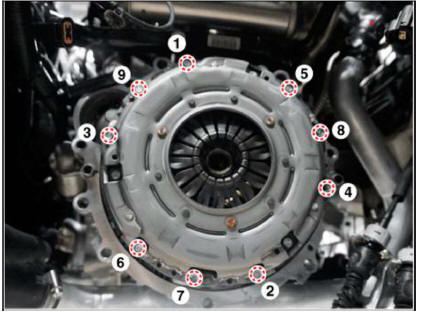
- Loosen the clutch cover mounting bolts and then removing the clutch cover.
- Be careful not to be bent or twist bolts.
- Loosen bolts in diagonal directions.
Gasoline 1.6 T-GDI
Gasoline 2.0 MPI / Diesel 1.6 TCI
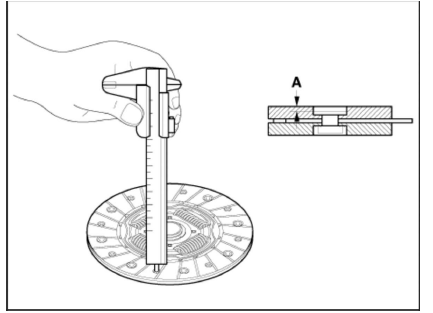
Inspection
- Inspect diaphragm spring wear which is in contact with a concentic slave cylinder bearing.
- Check the clutch cover and disc surface for wear or cracks.
- Check the clutch disc lining for slipping or oil marks.
- Measure the depth from a clutch lining surface to a rivet. If the measured value is less than the specification below, replace it.

READ NEXT:
 Clutch Cover And Disc- Installation
Apply grease on a disc spline part and transaxle input shaft spline part
as required.
Specified grease : CASMOLY L9508
Amount:
0.1 - 0.2g Gasoline 2.0 MPI / Gasoline 1.6 T-GDI
0.1 - 0.3g Diesel 1.6 TCI
Possible problems when not followin
Ignition Lock & Clutch Switch - Description
Description
Clutch operation is detected through clutch switch signal. This signal
enables ECM to cope with
instant change of load condition.
Clutch switch signal is used to detect engaged gear with vehicle speed
and engine speed.
Co
SEE MORE:
Forward Collision-Avoidance Assist Settings
Setting features
Forward Safety
With the engine on, select 'Driver
Assistance → Forward Safety' from the
Settings menu to set whether or not to
use each function.
If 'Active Assist' is selected, Forward
Collision-Avoidance Assis
Front Radar Sensor Alignment
WARNING
Adjustment may not be accurate if the vehicle and reflector are
placed on different ground levels or on a slope.
Perform in an area with minimum clearance of 8 m to the front.
4 m wide, and 1.2 m above the ground.
Remove heavy o
Information
- Home
- Hyundai Tucson - Fourth generation (NX4) - (2020-2023) - Owner's Manual
- Hyundai Tucson - Fourth generation (NX4) - (2020-2023) - Workshop Manual
