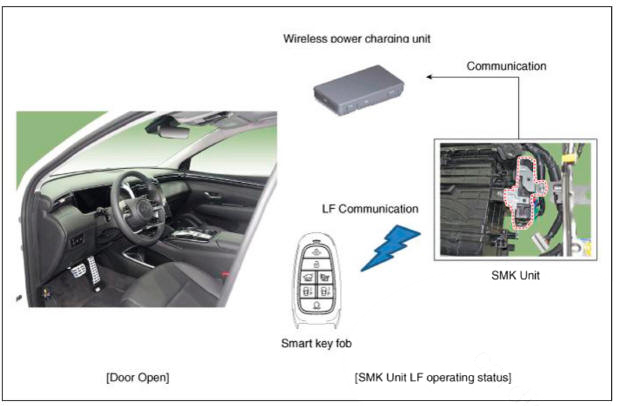
Hyundai Tucson: System Configuration Diagram
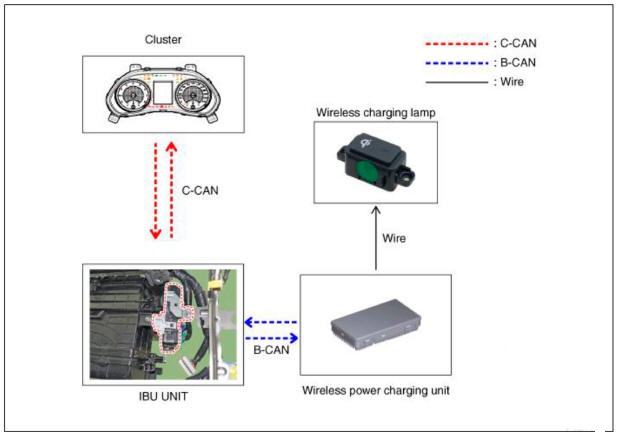
- Instrument cluster : Alerts about contact with mobile phone
- IBU unit: Determines contact with mobile phone
- Wireless charging lamp : Displays the charging status
- SMK unit: Stops charging during the activation of LF
Major Functions of Wireless Power Charger System
- Charging Function
(1) Activation method
- Close all doors of the car.
- Switch vehicle power to ACC or IG ON.
- Place the wireless charging-enabled mobile phone on the tray.
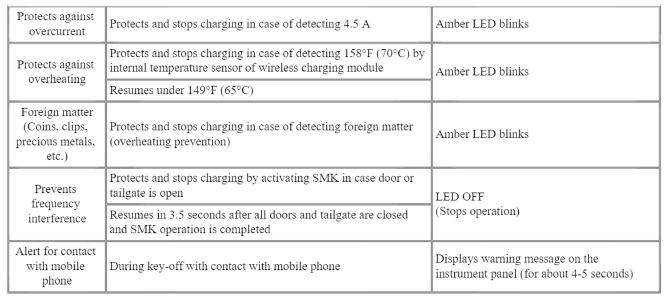
(2) Charging status display
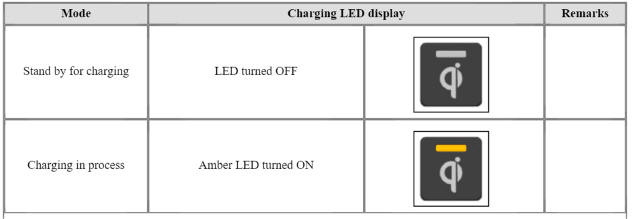
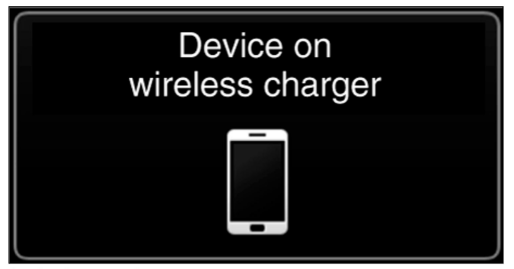
- Alert for contact with mobile phone
(1) Activation method
- Key OFF while the mobile phone is being charged.
- Checks if the mobile phone is placed on the wireless charging unit.
- Alert message for contact with mobile phone is displayed on the instrument panel (for about 4 - 5 seconds).
- Overheating prevention
(1) Activation method
- If the thermistor temperature inside the wireless charging module rises above a certain level (158ºF (70ºC)), charging will stop to protect the mobile phone battery.
WARNING
- The amber LED of the charging display lamp blinks 10 times for 10 seconds, and then it is turned off for 50 seconds (total 60 seconds).
- The process is repeated for every 60 seconds.
- If the thermistor temperamre falls below a certain level (149ºF (65ºC)), charging will restart.
WARNING
When the charging function is re-operated, the amber LED of the charging indicator lamp is displayed.
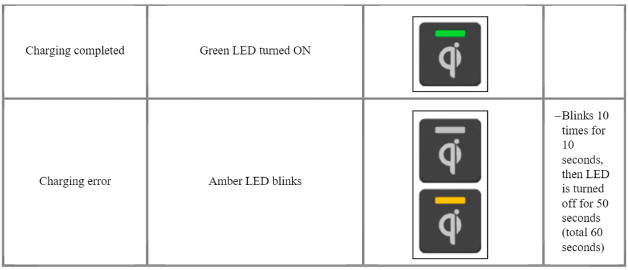
- Foreign matter detection
(1) Charging will be stopped if there is a coin or other metallic object between the wireless charging unit and the mobile phone.
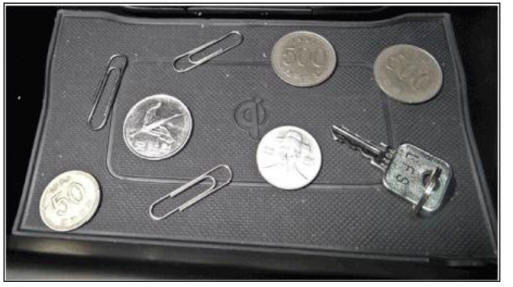 Foreign matter
WARNING
- Foreign matter : All metallic objects such as coins, clips, and precious metals
- The amber LED of the charging display lamp blinks 10 times for 10 seconds, and then it is turned off for 50 seconds (total 60 seconds).
- The process is repeated for every 60 seconds.
WARNING
Be careful as touching the foreign matter by hand may cause burns.
(2) After the system has detected foreign matter and stopped charging the mobile phone, the charging will resume in about 60 seconds once the foreign matter has been removed.
WARNING
When the charging function is restarted, the amber LED of the charging display lamp will be turned on.
- SMK unit LF frequency interference prevention
This function prevents interference between the wireless charging frequency and smart key unit frequency band.
(1) Wireless charging is stopped when the door is open or the SMK unit is in LF mode (searching for smart key), e.g. Wireless charging function is stopped if the driver carries the smart key out of the vehicle during IG ON.
WARNING
Charging will stop and the amber LED of the charging display lamp will nirn off.
(2) It will return to normal operating status when the LF mode of the SMK unit is completed.
- Turn the wireless charging function ON/OFF with USM.
Protection of Wireless Power Charger System

READ NEXT:
 Wireless power charging
Components
Wireless power charging unit
Wireless power charging lamp
Troubleshooting
Wireless Power Charger System Troubleshooting
R-l. Check the wireless power charger system operation
If the placement of a mobile phone is not
Diagnosis With Diagnostic Tool
In the body electrical system, failure can be quickly diagnosed by using
the vehicle diagnostic system (diagnostic tool).
The diagnostic systemf diagnostic tool) provides the following information.
(1) Fault Code Searching : Checking fai
Ignition Switch Assembly
Removal
Disconnect the negative (-) batteiy terminal.
Remove the steering column upper and lower shrouds.
(Refer to Body - "Steering Column Shroud Panel")
Remove the ignition switch (A) after disconnecting the 6P connector (B).
SEE MORE:
Interior Antenna
Interior 1 Antenna
Take care not to scratch the crash pad and related parts.
Disconnect the negative (-) battery terminal.
Remove the ecall unit.
(Refer to Emergency Call system - "Emergency Call (eCall) Unit")
Remove the inter
Front pillar trim
Component Location
Front pillar trim
Replacement
WARNING
When removing with a flat-tip screwdriver or remover, wrap
protective tape around the tools to
prevent damage to components.
Put on gloves to prevent hand injuries.
WA
Information
- Home
- Hyundai Tucson - Fourth generation (NX4) - (2020-2023) - Owner's Manual
- Hyundai Tucson - Fourth generation (NX4) - (2020-2023) - Workshop Manual
