Hyundai Tucson: Steering wheel - Removal
Hyundai Tucson - Fourth generation (NX4) - (2020-2023) - Workshop Manual / Steering System / Steering wheel / Steering wheel - Removal
Components
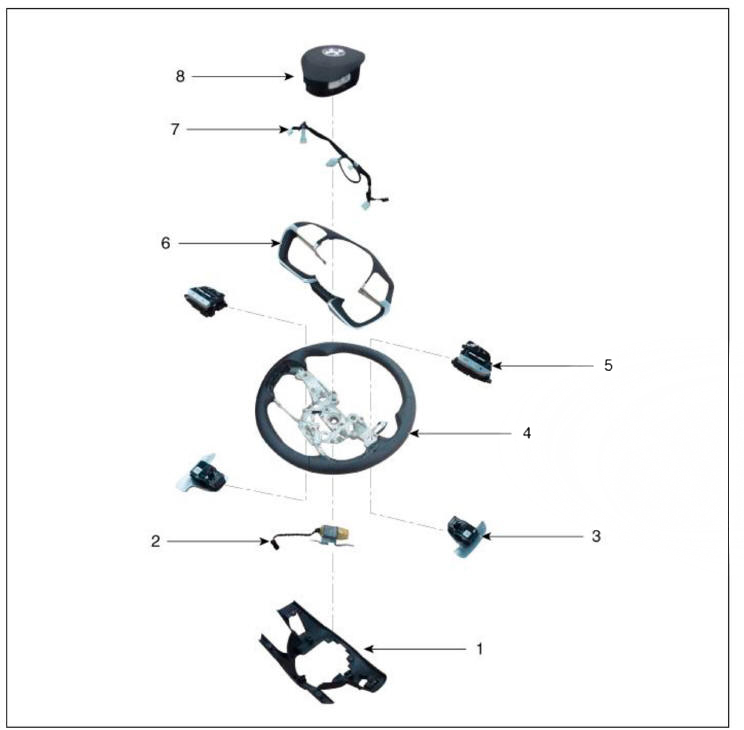
- Lower cover
- Haptic motorr
- Paddle shift
- Steering Wheel
- Remote control switch
- Switch bezel
- Wiring
- Drive airbas module (DAB)
Removal
- Turn the steering wheel so that the front wheels can face straight ahead.
- Turn the ignition switch OFF and disconnect the batteiy negative (-) cable.
- Remove the drive airbag module.
(Refer to Restraint - "Driver Airbag (DAB) Module and Clock Spring")
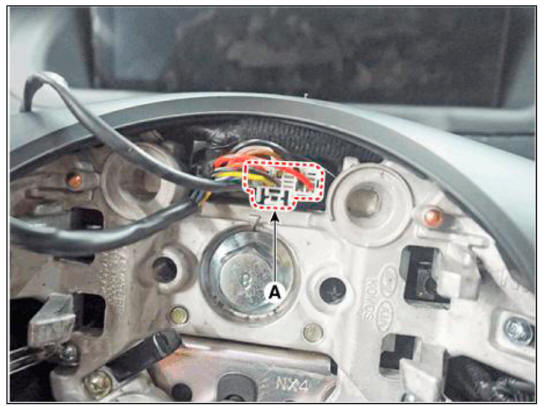
- Disconnect the steering wheel connector (A).
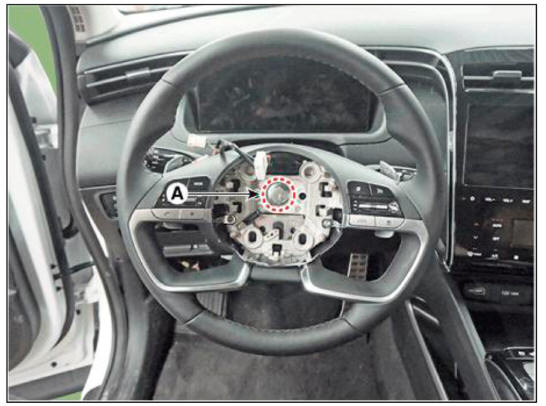
- Remove the steering wheel after loosening the bolt (A).
Tightening torque : 44.1 - 49.0 N.m (4.5 - 5.0 kgf.m, 32.5 - 36.2 lb-ft)
WARNING
- Do not reuse the steering lock bolt.
- When assembling, match the gear teeth as the below illustration.
READ NEXT:
 Steering wheel - Disassembly
Disassembly
Loosen the paddle shift switch mounting screw (A).
Remove the paddle shift switch (A) after disconnecting the connector.
Remove the lower cover (A) after loosening the screw.
Disconnect the wiring
Steering wheel - Reassembly
Reassembly
To reassembly, reverse the disassembly procedure.
Installation
To install, reverse the removal procedures.
Description
Heated pads to grip the steering grip makes the fever.
Heated pad
Specifications
System Circ
Heated Steering Wheel Control Module (Integrated Body Control Unit (IBU)
Turn the ignition switch OFF and disconnect the battery negative (-)
cable.
Remove the glove box.
(Refer to Body - "Glove Box")
Remove the heater control unit.
(Refer to Heating,Ventilation And Air Conditioning - "Hea
SEE MORE:
Ignition Switch Assembly
Removal
Disconnect the negative (-) batteiy terminal.
Remove the steering column upper and lower shrouds.
(Refer to Body - "Steering Column Shroud Panel")
Remove the ignition switch (A) after disconnecting the 6P connector (B).
Explanation of scheduled maintenance items
Engine oil and filter
The engine oil and filter should be
changed at the intervals specified in the
maintenance schedule. If the vehicle
is being driven in severe conditions,
more frequent oil and filter changes are
required.
Drive belts
Insp
Information
- Home
- Hyundai Tucson - Fourth generation (NX4) - (2020-2023) - Owner's Manual
- Hyundai Tucson - Fourth generation (NX4) - (2020-2023) - Workshop Manual
