Hyundai Tucson: Multifunction Switch - Components
Hyundai Tucson - Fourth generation (NX4) - (2020-2023) - Workshop Manual / Body Electrical System / Multifunction Switch / Multifunction Switch - Components
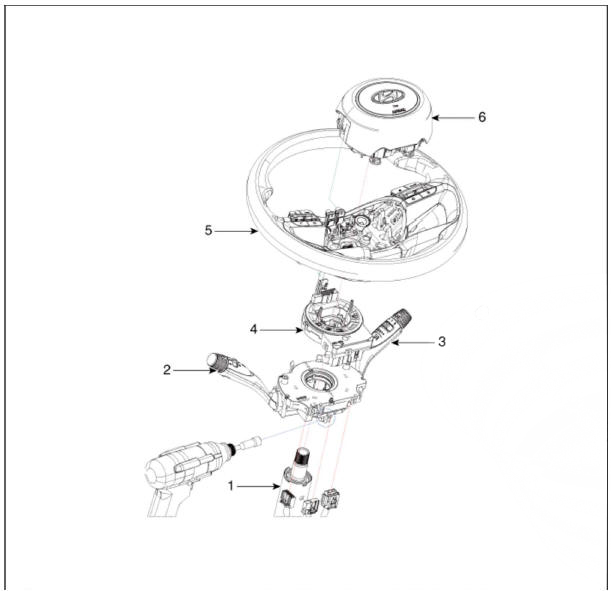
- Steering column
- Lighting swtich
- Wiper switch
- Clock spring
- Steering wheel
- Driver airbag (DAB)
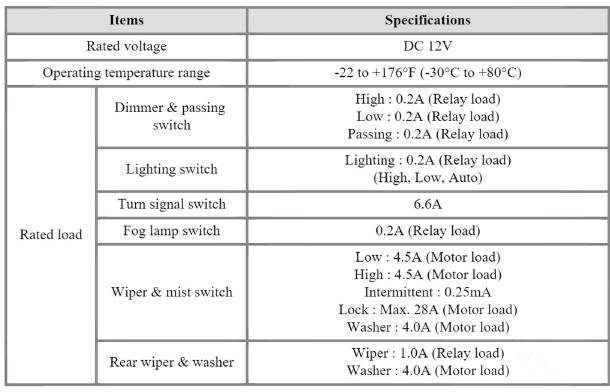
Specifications
Removal
- Disconnect the negative (-) battery terminal.
- Remove the clock spring.
(Refer to Restraint - "Driver Airbag(DAB) and Clock Spring")
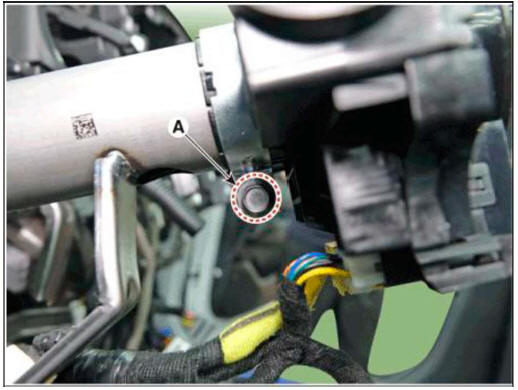
- Disconnect multifunction switch assembly connector (A).

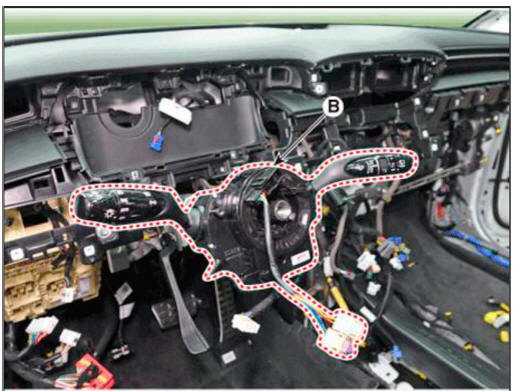
- Remove the multifunction switch assembly (B) after loosening the clamp (A).
Installation
- Install the multifunction switch assembly.
- Install the steering column upper and lower shrouds.
- Install the steering wheel.
- Connect the negative (-) battery terminal.
Inspection
READ NEXT:
 Multifunction Switch Inspection
Check for continuity between the terminals in each switch position as
shown below.
Inspection (With Diagnostic Tool)
In the body electrical system, failure can be quickly diagnosed by using
the vehicle diagnostic system (d
Horn
Component Location
Horn switch
Horn relay
Horn (Low pitch)
Horn (High pitch)
Clock spring
Removal
Remove the front bumper assembly.
(Refer to Body - "Front Bumper Assembly")
Remove the bolts and disconnect the h
AVN System
Description
AVN system
The AVN system has improved information search and easiness of manipulation
for the driver by
simplifying the system operation experience and unifying the display of the user
information such as
multimedia and car infor
SEE MORE:
GPF Regeneration- Description
Description
Continuous Variable Valve Timing (CVVT) system advances or retards the valve
timing of the intake and exhaust valve in accordance with the ECM control signal
which is calculated by the engine speed and load.
By controlling CVVT, th
Electric Exhaust Gas Re-circulation (EEGR) Control Valve
Description
The Electric EGR Control Valve is installed in between the EGR cooler and the
exhaust line and is a
solenoid valve. This valve controls EGR (Exhaust Gas Recirculation) amount by
the ECM's duty
control signal depending on engine
Information
- Home
- Hyundai Tucson - Fourth generation (NX4) - (2020-2023) - Owner's Manual
- Hyundai Tucson - Fourth generation (NX4) - (2020-2023) - Workshop Manual
