Hyundai Tucson: Heater - Inspection
Operating Logic Test (Manual only)
Inspect the PTC operation with the confirmation logic below :
- Entering
(1) Set the mode to FLOOR.
(2) Set the temperature to MAX HOT.
(3) Turn off the blower switch.
(4) Press the intake (recirculation) button 5 times or more.
- Forced operation
(1) Non-A/C : The intake button indicator will blink with an interval of 0.5 second for 30 seconds.
With A/C : The intake and A/C button indicator will blink with an interval of 0.5 second for 30 seconds.
(2) The PTC2 and PTC3 will operate by turning on the blower switch.
- PTC2 and PTC3 will operate with an interval of 3 seconds.
- PTC2 and PTC3 will trim off simultaneously when the blower switch is turned off.
- Only PTC2 and PTC3 will be forced operated.
- Cancellation
(1) Select A/C or intake (recirculation) switch.
(2) The test cancels automatically after 30 seconds.
(3) Turn the ignition switch off.
Operating Logic Test (DATC only)
The operating logic test can be confirmed with GDS.
Operating Test
This test should be performed in the PTC ON conditions.
- Run the engine.
- Check the current on the wiring with a clamp multi tester.

- If the current is not within specification, inspect the related wiring.
Resistance Test
- Turn the ignition switch OFF.
- Disconnect the PTC heater connector.
- Measure the resistance between terminal 1, 2 of PTC heater and ground line.
Resistance : 0.3 - 1.5
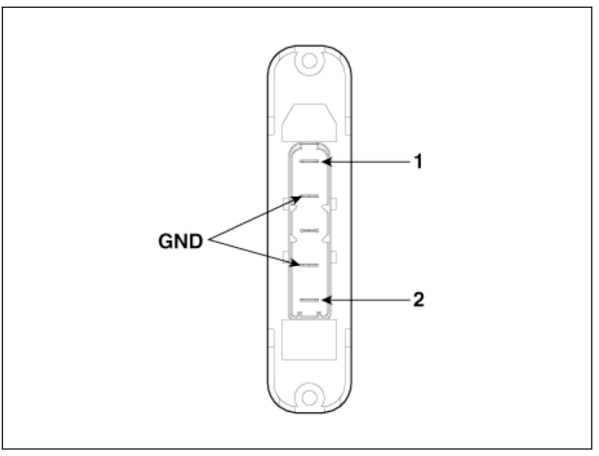
1)PTC 1
2)PTC 2
- If the measured resistance is not within specification, replace the PTC heater with a new one.
Replacement
- Disconnect the negative (-) battery terminal.
- Remove the cowl cross bar assembly.
(Refer to Body (Interior and Exterior) - "Cowl Cross Bar Assembly")
- Loosen the mounting screw, remove the driver's shower duct (A).
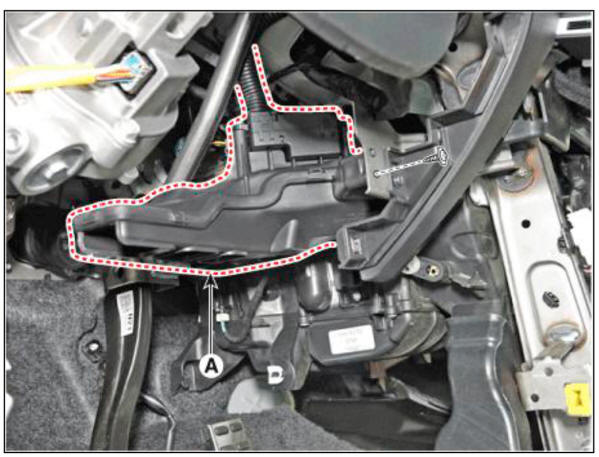
- Disconnect the PM sesnor connector (A) and hose (B).
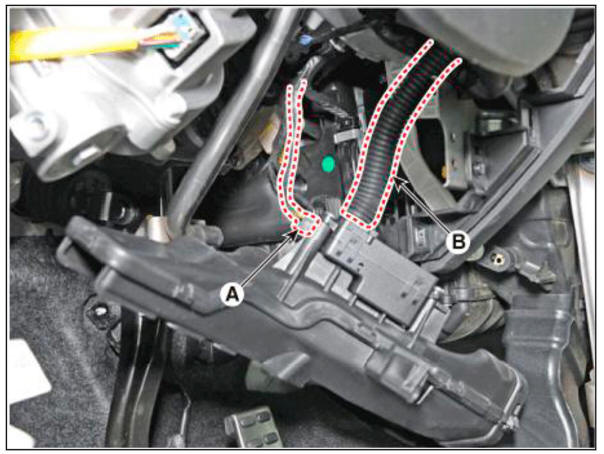
- Disconnect the PTC heater connector (A) and remove the PTC heater (B).
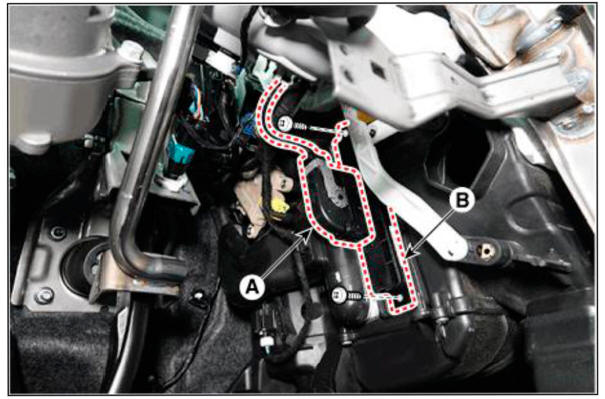
- Install in the reverse order of removal.
WARNING
Make sure the connector is connected properly.
Description
The heater unit includes mode control actuator and temperature control actuator.
The temperature control actuator is located at the heater unit. It regulates the temperature by the procedure as follows.
Signal from control unit adjusts the position of the temperature door by operating the temperature switch. Then the temperature will be regulated by the hot/cold air ratio decided by the position of the temperature door.
READ NEXT:
 Driver side temperature control actuator / Passenger side temperature
control actuator
Driver side temperature control actuator / Passenger side temperature
control actuator
Component Location
Driver side temperature control actuator
Passenger side temperature control actuator
Inspection
Turn the ignition switch OFF.
Disconnect the temperature control actuator connector.
Verify that the temperature c
Mode control actuator
Components Location
Mode control actuator
Inspection
Turn the ignition switch OFF.
Disconnect the mode control actuator connector.
Verify that the mode control actuator operates to the defrost mode when
connecting 12V to termina
Auto defogging actuator
Components Location
Auto defogging actuator
Inspection
Turn the ignition switch OFF.
Disconnect the auto defogging connector.
Verify that the auto defogging actuator operates to the open position
when connecting 12V to
termina
SEE MORE:
Vehicle Information, Consumer Information and Reporting Safety Defects
Exterior overview (I)
Front view
The actual shape may differ from the illustration
Hood
Headlamp
Tires and wheels
Side view mirror
Panoramic sunroof
Front windshield wiper blades
Windows
Front radar
Ex
Multi Air Mode
Multi Air Mode (if equipped)
When the Multi-Air mode button is
pressed, air flow is directed to the
face level and floor level and through
perforated sections along the instrument
panel for the driver and passenger. The
multi-air mode L
Information
- Home
- Hyundai Tucson - Fourth generation (NX4) - (2020-2023) - Owner's Manual
- Hyundai Tucson - Fourth generation (NX4) - (2020-2023) - Workshop Manual
