Hyundai Tucson: High Pressure Fuel Line- Installation
- Install in the reverse order of removal.
- Install the high pressure fuel pipe as follows.
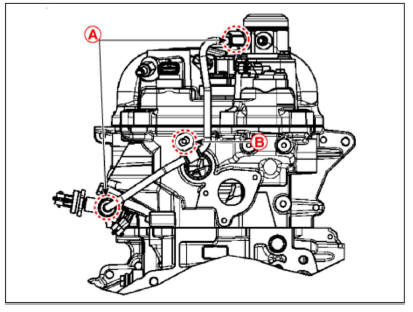
(1) Completely pre-tighten the both side nuts (A) on high pressure tightening area of high pressure fuel pipe while keeping them vertically.
(2) Tighten the high pressure fuel pipe function block mounting bolt (B).
Tightening torque : 9.8- 11.8 N.m (1.0- 1.2 kgf.m, 7.2-8.7 lb.ft)
(3) Completely tighten the both side nuts (A) on high pressure tightening area of high pressure fuel pipe.
Tightening torque : 29.4 - 35.3 N.m (3.0 - 3.6 kgf.m, 21.7 - 26.0 lb-ft)
WARNING
- Do not reuse the high pressure fuel pipe.
- Be careful not to transform the shape of the high pressure fuel pipe.
- Torque wrench should not be tilt when you tighten the nut.
- Follow the order and the tightening torque when you assemble.
- Inspect fuel leakage after high pressure fuel pipe assembly.
Removal
WARNING
- Be careful not to damage the parts located under the vehicle (floor
under cover, canister, fuel tank)
when raisinOs the vehicle usingO the lift.
(Refer to General Information - "Lift and Support Points")
- Turn the ignition switch OFF and disconnect the battery (-) terminal.
- Lift the vehicle.
- Remove the rear-left wheel & tire and wheel house cover.
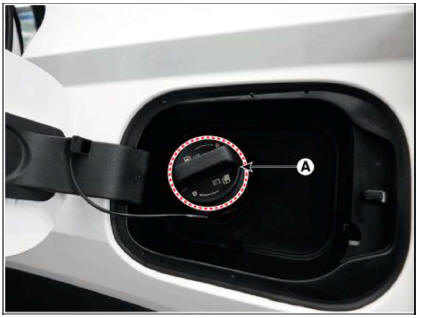
- Open the fuel filler cap (A) by turning it in the counterclockwise.
- Remove the LH rear wheel guard.
(Refer to Body (Interior and Exterior) - "Rear Wheel Guard")
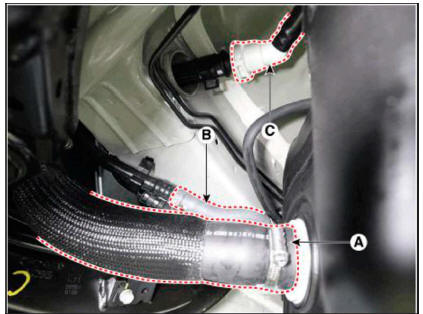
- Separate the fuel filler hose (A).
- Separate the fuel ventilation hose (B) and then remove the fixing clip (D).
- Disconnect the levelling hose quick-connector (C).
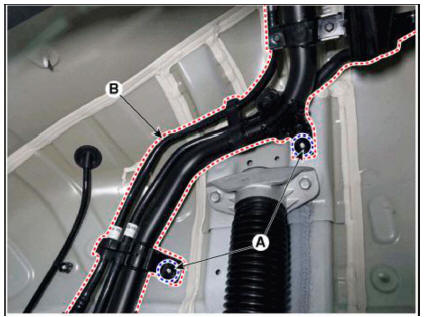
- Remove the filler-neck assembly (A) after loosening the mounting nut (B).
Tightening Torque : 7.8 - 11.8 N.m (0.8 - 1.2 kgf.m, 5.8 - 8.7 lb.ft)
Installation
- Install in the reverse order of removal.
Removal
- Turn the ignition switch OFF and disconnect the battery (-) terminal.
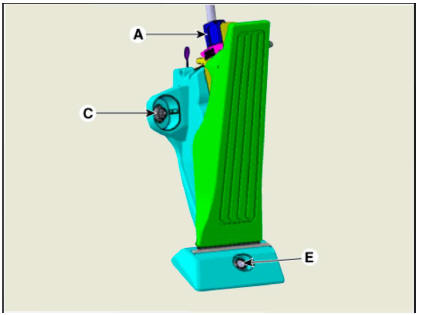
- Disconnect the accelerator position snesor connector (A).
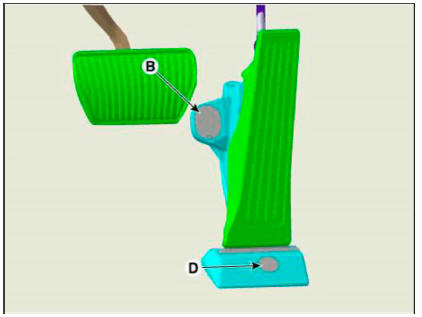
- Remove the upper mounting cap (B) and the loosen the mounting nut (C).
- Remove the lower mounting cap (D) and the loosen the mounting bolt (E).
Tightening Torque : 8.8 - 13.7 N.m (0.9 - 1.4 kgf.m, 6.5 - 10.1 lb.ft)
Installation
- Install in the reverse order of removal.
READ NEXT:
 High Pressure Fuel Line- Removal
WARNING
In case of removing the high pressure fuel pump, high pressure fuel
pipe, delivery pipe, and injector,
there may be injury caused by leakage of the high pressure fuel. So don't do any
repair work right after
engine stops.
Relea
SEE MORE:
Specifications
Service Data
Ignition System
Ignition Coil
Spark plug
Charging System
Battery
CMF60L-DIN
Model type description
Cold Cranking Ampere (CCA) : A rating used in the battery industry to define
a battery's ability
to start a
The DCT system-Adjustment
Adjustment
WARNING
If you replaced the dual clutch assembly or clutch actuator, be
sure to perform wear compensation by referring to the
following table.
If the rod length is less than 52 mm (2.0472 in.), replace all
of the dual cl
Information
- Home
- Hyundai Tucson - Fourth generation (NX4) - (2020-2023) - Owner's Manual
- Hyundai Tucson - Fourth generation (NX4) - (2020-2023) - Workshop Manual
