Hyundai Tucson: Engine Oil
- Check the engine oil quality.
Check the oil deterioration, entry of water, discoloring of thinning.
If the quality is visibly poor, replace the oil.
- Check the engine oil level.
After warning up the engine and then 10 minutes after the engine stop, oil level should be between the "L" and "F" marks in the dipstick.
If low, check for leakage and add oil up to the "F" mark.
WARNING
- Do not fill with engine oil above the "F" mark.
- Check the oil level gauge, based on a condition in which the engine oil temperature is a room temperature (20ºC - 25ºC).
- Make sure the tire pressure falls within the normal range.
- When measuring engine oil, make sure the road surface is even.
- After draining engine oil, make sure you check the total amount of drained oil before injection.
Selection of Engine Oil
Specification : SAE 0W-20, API SN PLUS (or above grade)
Allowed oil SAE viscosity : Refer to the recommended SAE viscosity number
Components
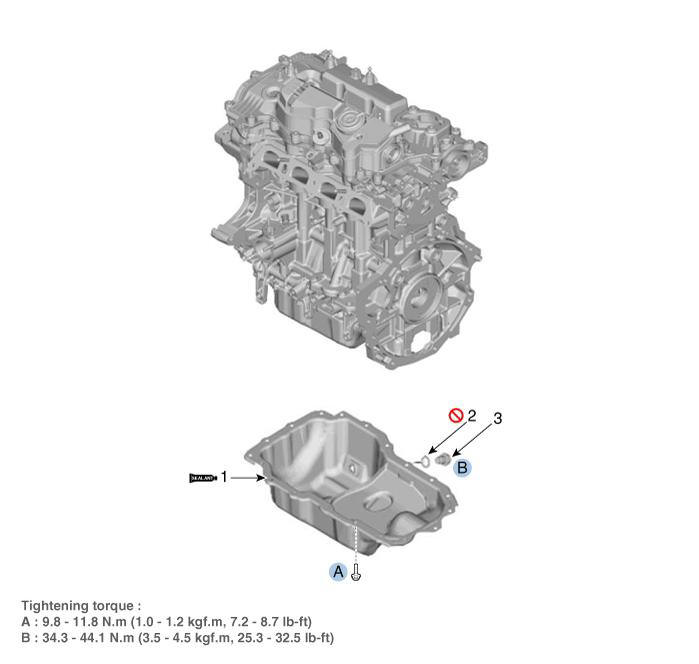
- Oil pan
- Oil drain plug gasket
- Oil drain plug
Removal
- Remove the engine room under cover.
(Refer to Engine and Transaxle Assembly System - "Engine Room Under Cover")
- Drain the engine oil.
(Refer to Lubrication System - "Engine Oil")
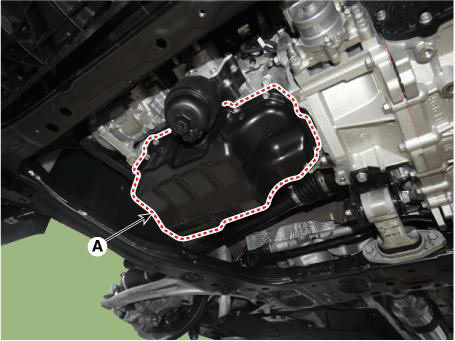
- Using the SST (09215-3C000) and remove the oil pan (A).
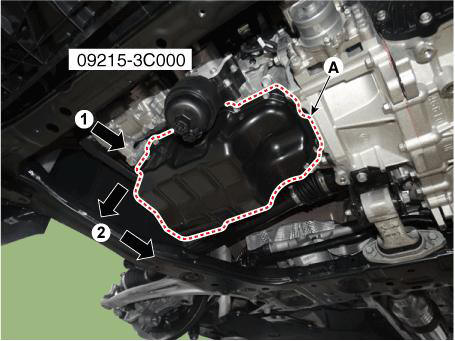
WARNING
- Insert the SST between the oil pan and the ladder frame by tapping it with a plastic hammer in the direction of ¬ arrow.
- After tapping the SST with a plastic hammer along the direction of  arrow around more than 2/3 edge of the oil pan, remove it from the cylinder block.
WARNING
Do not turn over the SST abruptly without tapping. It be result in damage of the SST.
Installation
- Install the oil pan.
(1) Before assembling the oil pan, the surface where the sealant is applied to should be free from the hardened sealant, foreign matters, oil, dust, moisture and etc.
(2) After applying liquid sealant on the oil pan, assemble it within 5 minutes.
Width : Ø 2.5 - 3.5 mm (0.0984 - 0.1378 in.)
Specification : MS721-40AA or AAO or above.
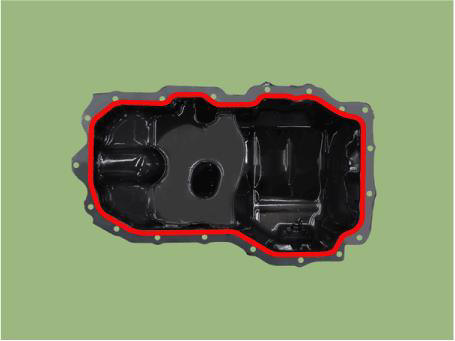
WARNING
- When applying sealant gasket, sealant must not be protruded into the inside of oil pan.
- To prevent leakage of oil, apply sealant gasket to the inner threads of the bolt holes.
- If the sealant is applied to the bottom surface of the lower crankcase, it should be the same position as the oil pan.
(3) Install the oil pan (A) with the bolts.
Uniformly tighten the bolts in several passes.
Tightening torque : 9.8 - 11.8 N.m (1.0 - 1.2 kgf.m, 7.2 - 8.7 lb-ft)
WARNING
After assembly, wait at least 30 minutes before filling the engine with oil.
- Refill engine oil.
(Refer to Lubrication System - "Engine Oil")
READ NEXT:
 Engine Oil - Removal and Installation
Disconnect the battery negative terminal.
Remove the engine room under cover.
(Refer to Engine and Transaxle Assembly - "Engine Room Under Cover")
Drain the coolant.
(Refer to Cooling System - "Coolant")
D
Oil Pump
Removal and
Installation
Remove the engine room under cover.
(Refer to Engine and Transaxle Assembly - "Engine Room Under Cover")
Drain the engine oil.
(Refer to Lubrication System - "Engine Oil")
Remove t
Oil Pump Chain
Disconnect the battery negative terminal.
Remove the timing chain.
(Refer to Timing System - "Timing Chain")
Remove the oil pump chain tensioner (A).
Tightening torque :
9.8 - 11.8 N.m (1.0 - 1.2 kgf.m, 7.2 - 8.7 lb-ft)
SEE MORE:
Troubleshooting
Symptom- Engine misfire with abnormal
internal lower engine noises.
Suspect area/ Remedy
Loose or improperly installed
drive plate(or fly wheel)./ Repair or replace the drive
plate(or fly wheel) as
required.
Worn piston rings.
(
Roof trim assembly
Component Location
Roof trim assembly
Replacement
WARNING
When removing with a flat-tip screwdriver or remover, wrap
protective tape around the tools to
prevent damage to components.
Put on gloves to prevent hand injuries.
W
Information
- Home
- Hyundai Tucson - Fourth generation (NX4) - (2020-2023) - Owner's Manual
- Hyundai Tucson - Fourth generation (NX4) - (2020-2023) - Workshop Manual
