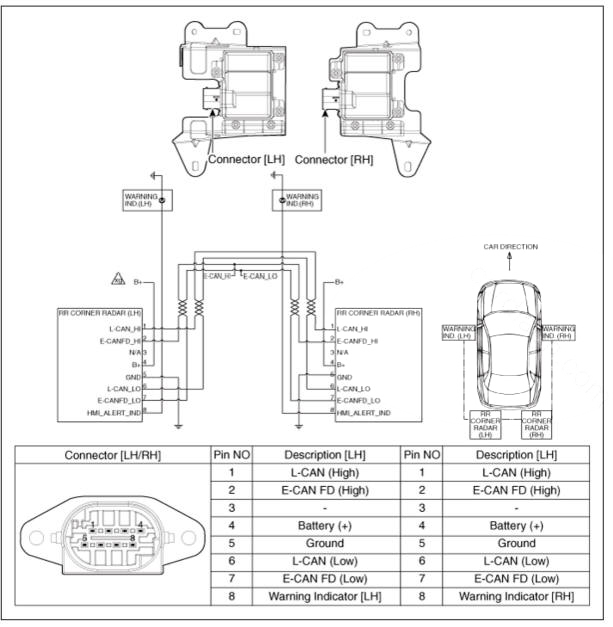
Hyundai Tucson: Connector and Terminal Function
Connector Funtion
Removal
- Disconnect the negative (-) battery terminal.
- Remove the rear bumper assembly.
(Refer to Body - "Rear Bumper Assembly")
- Disconnect the rear corner radar connector (A).
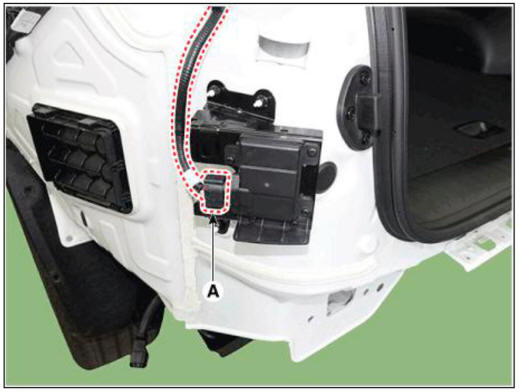
- Loosen the mounting nuts and remove the rear corner radar unit (A)
WARNING
Be care fill not to damage the bracket when removing the rear corner radar unit.
Installation
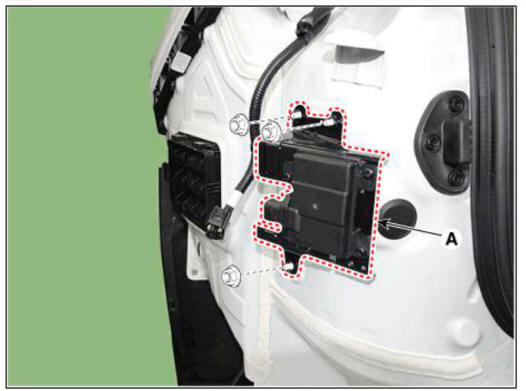
- Install the rear corner radar unit and bracket.
Tightening torque : 9.0 - 10.5 N.m (0.92 - 1.07 kgf.m. 6.7 - 7.7 lb-ft)
- install the rear bumper cover.
- Connect the negative (-) battery terminal.
WARNING
Take care not to confuse left side (master) and right side (slave) unit when installing.
- Perform "Correcting the Rear Corner Radar Unit Angle" procedures.
- Perform "Rear Corner Radar Calibration" procedures.
Inspection
Correcting the Rear Corner Radar Unit Angle
- After replacing the rear corner radar unit or bracket, with the bumper removed, use the rear corner radar unit correction tool set (special tool: 09985-3T500) to perform angle correction.
WARNING
- Perform the task on a level place.
- Perform the task after checking the tire pressure.
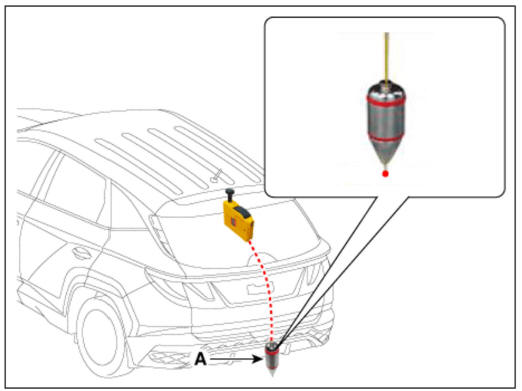
- Attach a vertical plumb (special tool: 09958-3T010) on the hood, and lower the plumb (A) to the ground so that it passes through the center of the emblem.

- Marking the center point below the plumb (A).

- Attach a vertical plumb (special tool: 09958-3T010) 011 the trunk (or tailgate), and lower the plumb (A) to the ground so that it passes through the center of the emblem.
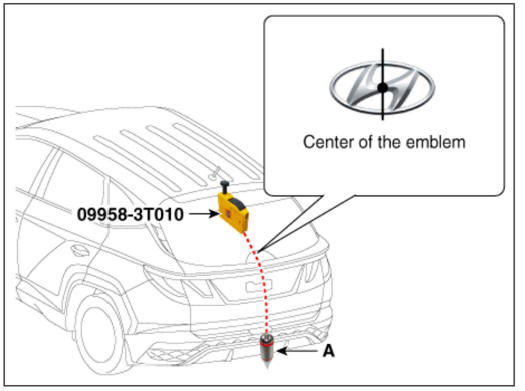
- Marking the center point below the plumb (A).
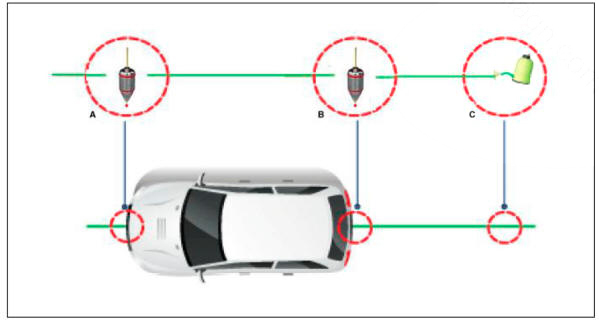
- Marking the center of vehicle by a string.
1 )Pass the string through the bottom of the vehicle from the rear of the vehicle to the front and fix the string to the center point (A) of the front of the vehicle.
2)Fix the string to the point (C) about 1.5 - 2m from the back of the vehicle so that it passes the rear center point (B).
- Mount the rear corner radar unit fixing adaptor (special tool: 09958-3T080) on the rear corner radar unit and fix the level laser (special tool: 09958-3T070).
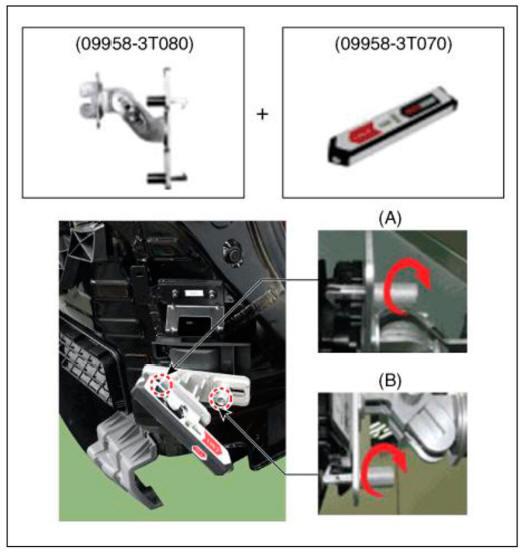
WARNING
When with the rear corner radar unit cover, remove the cover and then mount the fixing adapter (special tool: 09958- 3T080).
- Measure the angle (C) between the center line (A) of the angle measuring plate and the horizontal laser beam (B) using a digital protractor (special tool : 09958-3T090).
Horizontal Augle (C): 45º +- 3º

- Use a digital inclinometer (special tool: 09958-3T100) to measure the vertical angle of the rear corner radar unit.
Vertical Angle : 90º= 1.5º
WARNING
Digital Inclinometer (09958-3T100) Vertical measurement angle (A):
90º +- 1.5º 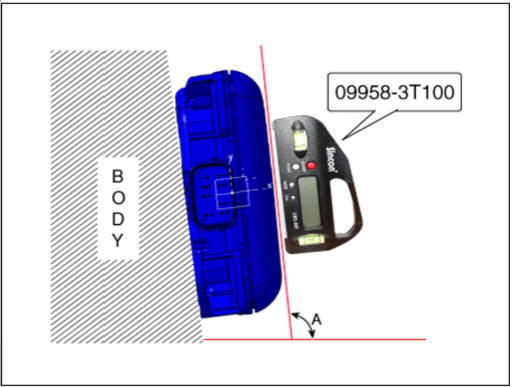
- Measure the horizontal and vertical angles of left and right rear corner radar units. If the measured values deviate from the specified values, insert a washer between the bracket of the rear corner radar unit.
Specified Values
Horizontal Angle : 45º +- 3º
Vertical Angle : 90º +- 1.5º

- After checking and correcting the rear corner radar unit angle, perform the rear corner radar correction procedure
READ NEXT:
 Rear Corner Radar Calibration
Rear bumper accident vehicles and vehicles that replaced rear corner
radar units must perform rear corner radar unit alignment
using Diagnostic tool.
Connect the cable of Diagnostic tool to the data link connector in
driver side crash pa
Parking Distance Warning (PDW)
Description
PDW consists of 8 sensors (front: 4 units, rear : 4 units) that are used
to detect obstacles and transmit the result in three
separate warning levels, the first, second and third to IBU via LIN
communication.
IBU decides the
SEE MORE:
Intake actuator
Components
Intake actuator
Inspection
Turn the ignition switch OFF.
Disconnect the intake actuator connector.
Verify that the intake actuator operates to the fresh air position when
connecting 12V to terminal 3 and grounding ter
Camshaft - Inspection
Measure the height of the cam.
Check the surface of the cam lob for wear and tear. If necessary, replace the
camshaft.
Cam height
Intake : 37.33 mm (1.4697 in.)
Exhaust : 37.44 mm (1.474 in.)
Inspect the camshaft journal clearance.
Information
- Home
- Hyundai Tucson - Fourth generation (NX4) - (2020-2023) - Owner's Manual
- Hyundai Tucson - Fourth generation (NX4) - (2020-2023) - Workshop Manual
